Monday, September 10, 2012

Rasberry Crumb Bars

Aren't you proud of yourself when you put something together really quick, using nothing but the ingredients you have on hand?  Last week, I threw together coriander rubbed pork roast, wild and brown rice medley, and braised cabbage with caraway seeds.  Yes..I was proud of myself!  
I found myself in that situation again yesterday, when at the last minute, I volunteered to host Bible Study at my house.  My darling husband pitched in and vacuumed the entire downstairs (even the staircase--thanks honey!) I ran around the house with a dust cloth, and glass cleaner, while one of the girls cleaned the powder room.  It's so great to have help when you need it. ;-)


During the cleaning frenzy, I set my butter out to soften, and by the time we were done, it was ready to go.  I'd done a quick search on the internet for crumb bars, and decided to go with the fresh raspberries I had in the fridge.  I wasn't sure the only other fruit I had--frozen cranberries would be sweet enough.   I also substituted brown sugar for some of the white sugar for a bit of chewiness, and some rolled oats for texture.  Feel free to use blackberries, blueberries, or a mix of berries instead of raspberries.  This is a great way to give a final nod to summer's bounty and welcome the first hint of cooler weather. :-)

Raspberry Crumb Bars 

2 cups all purpose flour
1 cup rolled oats (not the instant oats)
1/2 cup white sugar
1/2 cup firmly packed brown sugar
1 teaspoon baking powder
1/2 teaspoon salt
1 teaspoon cinnamon
1 large egg
2 sticks (1 cup) unsalted butter at room temperature
4 cups fresh raspberries rinsed lightly and gently patted dry
1/2 cup white sugar
3 teaspoons cornstarch 

Preheat the oven to 375 degrees.  Lightly grease a 9x13 baking pan and set it aside. 

In a medium bowl, combine the flour, oats, white sugar, brown sugar, baking powder, salt, and cinnamon.  Add the butter and using a pastry cutter, cut it in until you have a crumbly dough.  Gently stir in the egg. Take half of the dough and pat into a thin layer on the bottom of the prepared baking dish.  Set aside. 

In another medium bowl, gently toss the raspberries with the 1/2 cup white sugar and cornstarch.  Pour the raspberries into the pan, and evenly distribute any remaining sugar/cornstarch mixture.  Take the other half of the dough and crumble it over the top of the berries.  

Bake at 375 degrees for 40-45 minutes, or until the top is golden brown and the fruit is bubbly.  Let cool to room temperature before cutting into squares.  Serve alone, or with ice cream (black raspberry ice cream anyone? ;-)

I will be perfectly honest and say that only 1 person was able to come to Bible Study.  Oh well, more raspberry bars for the rest of us.  I know somebody snuck another helping when I wasn't looking (my money's on Rebecca), and both girls begged for a bar in their lunchboxes for today.  Of course, I let them...these things are so good, I'd better get 'em out of the house!

I hope you are lovin' the "cool" front we got over the weekend.  Sure, it's still warm (around 90 degrees today), but the humidity is only at 32%--REALLY nice for our part of Texas this time of year).  Break out the bowls, turn on the oven, and bake these up--you can have them ready in no time!  

God bless your table tonight!

Thursday, September 6, 2012

Pan Seared Pork Chops with Apples and Sage

It's not quite fall yet here (today's high is supposed to be 99 degrees!), but sometimes you just get a hankering for fall flavors.  That's what happened about 2 weeks ago, while I was digging through the deep freezer to find something to make for dinner.  I came across a package of bone-in pork chops, there were plenty of apples in the fruit bowl, and fresh sage in the herb garden outside--bingo!  Pork chops and apples. :-)

This is a simple, fast meal to get on the table on a busy weeknight.  I went so fast, I didn't take pictures of the cooking process---sorry guys.  It took me 35 minutes, start to finish...not bad!  And it's healthy to boot.  All you have to do is make a green veggie or salad on the side, and you're all set. ;-)

Pan Seared Pork Chops with Apples and Sage

6-8 fresh sage leaves
2-4 tablespoons olive oil
Salt and black pepper to taste
4-6 bone-in or boneless pork chops, about 1/4 inch thick 
2 gala or golden delicious apples, cored and cut into 1/4 slices 
1/4 cup apple butter or unsweetened applesauce 
2 tablespoons butter
1/2 to 1 cup white wine 

In a large, deep skillet, heat the olive oil over medium-high heat.  When it's hot, but not smoking, drop in the sage leaves.  Fry for 30 seconds to 1 minute, or until crispy.  Remove to a paper towel lined plate and set aside.  By frying the sage leaves, we'll impart that great flavor from the sage to flavor the oil, and use it to infuse the pork chops. 

Season the pork chops on both sides with salt and pepper.  In the same pan you used for the sage leaves, heat another 2 tablespoons of olive oil.  Brown the chops (in batches if necessary to prevent crowding the pan) on both sides and remove to a plate.  It's not necessary at this point to cook the pork chops through...they'll finish in the sauce. 

Now drop the butter into the pan, and toss in the apples.  Saute the apples for about 6-8 minutes until they're nice and golden brown, but not cooked through.  Add the white wine, apple butter, and more salt and pepper to taste.  Bring to a gentle boil, and put the pork chops back in, along with any juices that accumulated on the plate (don't throw that out...it's flavor for your sauce!).  

Simmer for about 8-10 minutes.  You want the pork cooked through, and the apples tender, but take care not to overcook both.  

Plate the pork chops and apples on a large serving platter, and pour the pan sauce over the top.  Garnish with the fried sage leaves.  

You could certainly add onions to the pan along with the apples, but that usually starts a riot with 2 of my kids, so I left them out.  Everyone loved the apples...who can resist warm apple slices and pork?  Not me! ;-)

David was home late as usual, but he loved this dish too, and took leftovers to work the next day for  lunch.  You'll notice in the pictures that I made 10 pork chops.  Four to six chops doesn't feed us anymore, so I usually double just about every recipe I post.  


 Let me know if it's getting cooler in your next of the woods, and if you're cooking fall flavors.  We'll be sweatin' it out here in southeast Texas for another month or so before we cool off, so enjoy it for me!  

God bless your table tonight!

Thursday, August 9, 2012

Cinnamon Cranberry Almond Granola

About 8 weeks ago, a dear friend of mine, Amy had her 7th baby (nope, not a typo!), so of course I made her a HUGE pan of baked penne to hopefully feed her crew for a few days.  Last time our mom's group had a bake sale, I made up a few containers of granola, and was told they sold like hotcakes.  Amy bought some herself and jokingly said,

"Can I put my order in for some of that amazing granola when I have the baby?"  

Well of course you can...I aim to please.  Postpartum mothers deserve special treatment! ;-)

So I made not one, but 3 batches of granola, because I knew if I didn't make enough for us at home, my Rebecca would never forgive me.  Well...she would...eventually.  But I honestly wanted plenty for myself too...it's perfect over plain, Greek yogurt.  Trust me...it really is. 

Cinnamon Cranberry Almond Granola

1/4 cup olive oil
1/3 cup honey
1/2 cup packed light brown sugar
1/2 teaspoon salt
1 teaspoon cinnamon 

3 cups old-fashioned, rolled oats (not the instant kind!)
1 cup dried cranberries
1 cup sliced almonds
1 cup unsweetened, shredded coconut

Preheat oven to 325 degrees.  Line 2 rimmed baking sheets with aluminum foil, and lightly grease with non-stick cooking spray.

In a small pot, combine with olive oil, honey, brown sugar, salt, and cinnamon over low heat.  Stir occasionally until all the sugar has dissolved.  It can bubble a bit around the edges, but don't let it boil.  Turn off the heat and set aside. 

Now in a large bowl, combine the oats, cranberries, almonds, and coconut.  

Carefully pour the sugar mixture over the oats mixture, and immediately toss...toss, and toss some more, until all the dry ingredients are evenly coated. 

Spread the granola out in a fairly even onto the prepared baking sheets.  Make sure to divide it as evenly as you can...otherwise it won't bake up properly. 

Bake at 325 degrees for 15 minutes, then rotate and switch the pans out (from top to bottom and front to back).  Again...this helps it bake evenly.  Bake for another 10-15 minutes or until golden brown.  Ovens can vary temperature wise...so be sure to watch it the last 10 minutes or so...you don't want it too dark or burnt (dark coconut is quite bitter!). 

Let cool in the pans for 15 minutes, then peel it off the foil...it may come away in big pieces.  Just break it up with your hands as you pull it away. 

Serve alone with milk, or sprinkle a generous portion over plain yogurt.  It's also yummy over frozen yogurt or ice cream.  Just sayin'. ;-)

David and Rebecca eat this stuff straight out of the container...it was gone in less than a week.  I may have to quadruple the recipe next time!  

Happy crunching, and God bless your table tonight!


Friday, July 20, 2012

Fig Pizza with Prosciutto, Caramelized Onions, and Goat Cheese

 David came home with a jar of whole, preserved figs last week.  I've never used them before, so I hit the internet to see what recipes would pop up.  I saw one for a pork roast, but we just finished off these pork chops...so I didn't want to put more on the table.  I'd seen recipes for fig pizza before, and decided to try it, since it would be simple, and I could have a cheese/pepperoni option for the kids.

So I made this over the weekend, and I'm tellin' you...it was delicious.  The only part that was time consuming were the onions.  I probably cooked 'em for about an hour.  Caramelized onions can't be rushed...but they are so worth it if you've got the time.  And if you don't have whole, preserved figs, fig preserves are a fine substitute. 

Fig Pizza with Prosciutto, Caramelized Onions, and Goat Cheese

One recipe homemade pizza dough, or 1 tube refrigerated pizza dough (we like the "thin" crust)
2 medium or one large red onion, thinly sliced
1 tablespoon olive oil
About 16 small preserved whole figs (roughly chopped), or about 1/2 cup fig preserves
1 teaspoon dried thyme leaves, or 2 teaspoons fresh thyme
2 ounces fresh goat cheese
3 ounces prosciutto, torn into pieces

In a medium skillet over low heat, heat the olive oil.  Add the red onion and cook slowly, stirring frequently for 45 minutes to one hour, or until the onions are almost dry, and deep purplish/brown in color. (Regular white/yellow onions work well too).  If you don't that much time, just cook them for as long as you can.  Set aside.  

Spray a baking sheet with non-stick cooking spray.  Preheat oven to 400.  If you're using a homemade dough, spread it out and prebake it for 5 minutes.  Do the same thing if you're using a premade, refrigerated dough.  

Spread the chopped figs/fig preserves over the crust.  It may not look like it's enough, but you don't want this to be overly sweet.  Sprinkle with a touch of salt and pepper, and the thyme.  Scatter the prosciutto over the spices.  Then distribute the onions over the top, and dot with pieces of goat cheese.  

Return the pizza to the oven, and back for an additional 8-10 minutes, or until the crust is deep golden brown.  The goat cheese will get very soft, but will not melt completely.  

Slice and serve immediately.  


 David, Rebecca, and I practically inhaled this.  I made another pizza (cheese and pepperoni) for the rest of the kids.  I will say one thing...this is a "dry" pizza, meaning there's no sauce at all.  You may prefer it as an appetizer instead of the main course.  Next time I make it, I'll reduce some balsamic vinegar to use as a base sauce.  (Just take 2 cups of balsamic vinegar and simmer until reduced by at least half, and is the consistency of maple syrup).  I think that, along with a touch more thyme and pepper, will be a nice compliment to the salty prosciutto and tangy goat cheese.  

This would a perfect treat to make for a cocktail party, ladies night out, or just for a quiet night in. :-).  Everyone loves pizza...and it's a nice change from your usual tomato-cheese combination. 

Hope you're enjoying your summer.  God bless your table tonight!

PS...You may have noticed I'm not posting as many pictures as I usually do.  I really love taking pictures of every step, but I just don't have the time these days.  It's tricky trying to hold the camera while a baby is tugging/fussing/crying at your knees too. So for now, less pictures, but hopefully plenty of details regarding each recipe so you won't miss a thing. ;-)

Monday, July 16, 2012

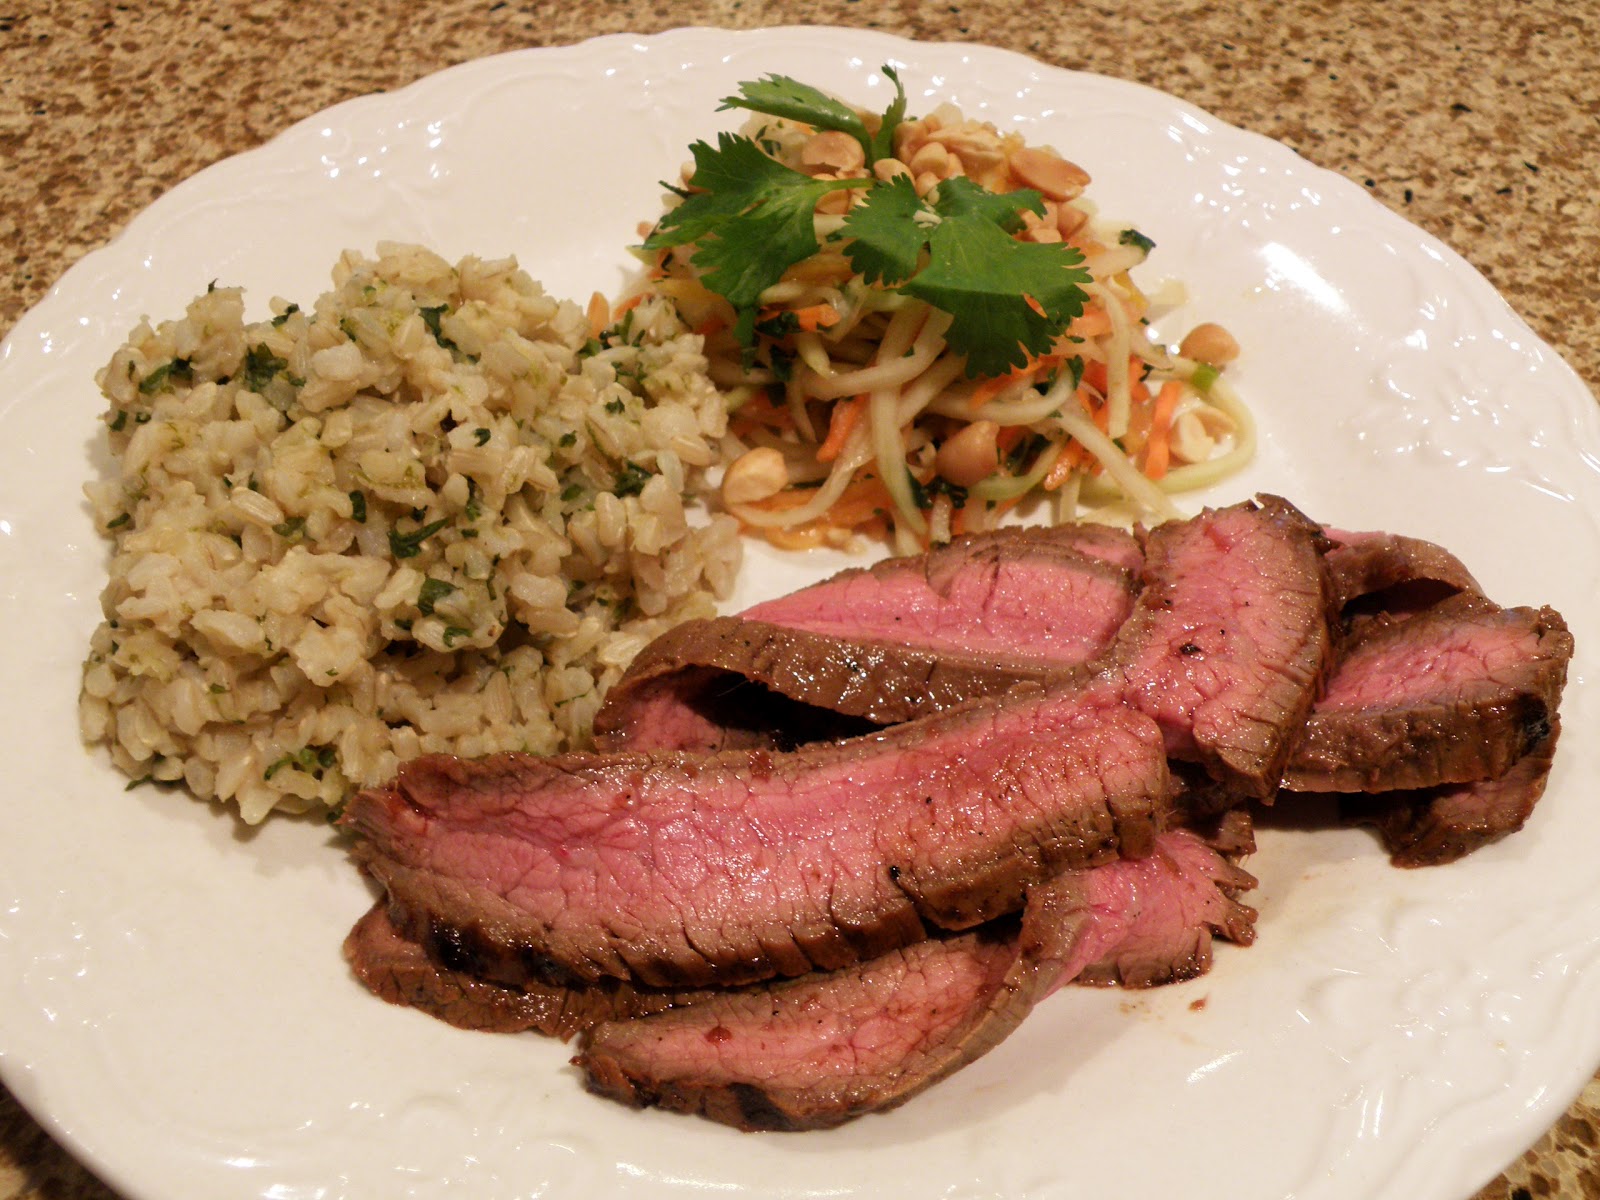
Asian Grilled Flank Steak with Cilantro-Lime Brown Rice and Green Papaya Salad

Ever since we got back from our trip to Utah, I've been somewhat obsessed with this green papaya salad I had a Takashi.  I just LOVED the combination of classic Thai flavors...sweet, sour, salty, and spicy.  Once we got back home, I was determined to try and recreate it.  I am still on my healthy eating kick, although I admit I haven't gotten back to my exercise routine yet.  It's been pouring rain for the past week!  

First, I had to find green papayas.  A query on Facebook and a friendly answer led me back to Hong Kong Market...where I found green papayas aplenty.  We hadn't had beef in a while, so I grilled up a flank steak, and made some simple brown rice with some cilantro and lime to compliment the flavors in the steak marinade.  

When I tried my homemade papaya salad, I was not disappointed.  The only difference was the spice factor...it was a tad spicy...not overwhelmingly so, but it was "there." ;-)  Next time, I'll only use one squirt of siracha. Feel free to modify the dressing ingredients to your taste.  

Asian Grilled Flank Steak with Cilantro-Lime Brown Rice and Green Papaya Salad 
(Steak recipe courtesy of Skinnytaste.com)

For the Asian Grilled Flank Steak recipe, click here.  I used Gina's recipe from skinnytaste.com...but to save time, I didn't skewer the meat, just grilled the whole steak and thinly sliced it.  

FOR THE RICE:
2 cups low-sodium chicken broth
1 cup brown rice
Juice and zest of 2 limes
1/4 cup freshly chopped cilantro
Salt 

Bring the chicken broth to a boil along with 1 tablespoons of salt.  Add the rice and reduce the heat to a simmer.  Cook for 45-50 minutes until all the broth is absorbed and the rice is tender.  Fold in the lime juice, zest, and cilantro.  Set aside.  


FOR THE GREEN PAPAYA SALAD:
1-2 firm, green papayas (they really need to be VERY under ripe)
1/2 cup shredded carrot (buying the preshredded carrots in the produce section saves time!)
3 green onions, minced
1/4 cup freshly chopped cilantro, plus more for garnish
1/4 freshly chopped mint
1/4 cup unsalted peanuts, dry-roasted and chopped fine

DRESSING:
1/4 fresh lime juice
3 tablespoons fish sauce
2-3 teaspoons packed brown sugar
1 tablespoon garlic, minced
1-2 squirts of siracha (found in the Asian aisle of your grocery store)

In a large bowl, combine all the salad ingredients except the peanuts.   I found that 2 medium-sized papayas was a good amount to use with the dressing.  Mix all the dressing ingredients together and pour over the salad.  Toss well, and serve immediately, garnished with the chopped peanuts and cilantro if desired.  You can also hold the salad in the fridge for 6-8 hours...it'll be fine. :-)

Would you believe that 2 of my kids actually ate the salad?  Rebecca said, "It tastes like everything...sweet, and spicy!"  David said it was great...and even Theresa noshed on a few shreds of papaya and carrot. :-)

Although it was a big more work than I anticipated, and my kitchen was a MESS afterwards, I really want to keep this papaya salad in my repertoire.  It's super healthy, delicious, and refreshing during the hot summer months.  Go to your nearest Asian grocery store...all the ingredients should be there...and it'll be a fun field trip for the kids.  Now...if only I had some sushi to eat with the salad!

Enjoy, and God bless your table tonight! 

Saturday, July 14, 2012

BBQ Pork Chops with Mango Salad

David is pretty good about getting meat at the grocery store when it's been marked down.  Some people turn up their noses at protein that's about to expire.  But as long as you cook it right away, or freeze it immediately, it shouldn't be an issue.  We've gotten everything from brisket, to ground beef, to chicken quarters this way.  

Last night, my hubby came home with 2 big packages of chicken leg quarters.  There were 4 to a package...one was $3.30, and the other one was $2.40.  And, they were preseasoned with lemon-pepper to boot.  Good job honey! :-)

So...I will grill off that chicken sometime within the next day or two.  For today's post, I made some simple BBQ pork chops, and paired it with a cool mango salad...perfect to serve on a hot summer day.  It would be equally tasty with steak or chicken too!  I 

BBQ Pork Chops with Mango Salad

6 bone-in or boneless pork chops (more if you're feeding a family of our size ;-)
BBQ spice rub of choice
BBQ sauce of choice

2 ripe, but firm mangoes, cubed
1/4 cup thinly sliced red onion
1 tablespoon freshly chopped mint or basil 
1/4 crumbled feta cheese
Juice of 1-2 small limes
Black pepper to taste 

Preheat your outdoor/indoor grill pan to medium high heat, and lightly oil the grates/pan.  Sprinkle both sides of the pork chops with the BBQ spice blend.  Rub it in to make sure it sticks (this can be done earlier in the day to give the meat a chance to marinate the seasonings).  Grill the chops for 3-4 minutes per side or until a meat thermometer reads 135-140 (keep in mind it will rise a few more degrees once you remove it from the grill).  I honestly don't bother with a thermometer...I just poke  the meat with my finger...if it gives just a tad, it's done.  Just watch 'em...and don't make pork bricks!
For the salad...combine the mango, red onion, mint or basil (use the mint for a "fresher" taste or the basil for a "peppery" taste), feta cheese, lime juice, and black pepper.  This can sit out for one hour before serving if you'd like to meld the flavors.  I personally like mint...but it's totally up to you.  

Serve the pork chops with the mango salad.  You can also put out some baked beans if you have picky tongues at the table like I do.  


Well...I was pleasantly surprised to hear no complaints over this meal.  David, Rebecca, Theresa and myself all loved the salad...the other kids had baked beans and baby carrots.  So everyone got their veggies...score one for Mom!  I personally loved the salty, earthy feta with the sweet, cool mango...it was refreshing on a damp, rainy day.  

Enjoy, and God Bless your table tonight!  

Wednesday, July 11, 2012

Salt Lake City Eats

David and I went to Utah over the 4th of July week.  We stayed at Snowbird Ski and Summer Resort, and had an awesome time.  We had a condo with a full kitchen, queen-sized bed, and a 2-person hot tub on the balcony...perfect after a long day of alpine activities and walking around Salt Lake City. 


But what I really wanted to share with you in this post is all the tasty food we ate.  I mean...that's the most important thing when you go on vacation, right? ;-)


First stop...Blue Plate Diner.  David just googled for places on Yelp, and this where we ended up. 
I had the Eggs Benedict with Salmon (he had a burrito with a green pork chili sauce).  


I thought it was pretty good...the salmon was fresh, and the hollandaise sauce was light and lemony...not heavy at all.  I did think the onions could have cooked longer...they were practically raw. 


A day later, we had dinner at Red Rock Brewing Company.  David had the BBQ Chicken Pizza (which he said was good, but the chicken could have had more flavor), and I had the Sweet Potato Cannelloni.  It was amazing...and very rich.  Good thing I behaved myself and had a big salad first (and only ate 2/3rd of my entree).  I honestly don't think I could have had more).  


Thursday night found ourselves at a popular Mexican joint...The Red Iguana.  They're famous for their moles...I think 8 different kinds?  I had the Mole Negro with Chicken, and David ordered the Seafood Fajitas.  Both plates were SO GOOD.  Trust me...we're from Texas..  We know good Mexican food.  


The only thing amiss at this place was David's margarita.  I had a mango margarita...and it was just fine.  But David's first one tasted like water, and the second one, although better, was sour and limey...not bright and sweet, with an aftertaste of tequila.  Maybe it's hard to get good liquor in Mormon town?  Oh well.  


Our last night on vacation, we decided to splurge a little, and I was craving sushi.  I needed some healthy fresh food!  So David consulted Yelp again (lol), and we walked into Takashi...supposedly the "best" sushi restaurant in Salt Lake City. 


Well...some may have a difference of option, but the food at Takashi was superb.   This was definitely my favorite meal from the whole week.  They fly in fresh fish nearly every day...and it shows.  My sashimi plate was stellar...the fish tasted firm and sweet, the miso soup was hot and savory...and I devoured the green papaya salad so fast...David only got 2 bites.  I guess I was hungrier than I thought (sorry my love!).  ;-)


Here's the sushi we had...yellowfin tuna with scallions.  YUM.  

I didn't get a pic of the sashimi plate...here's one I'm borrowing from Yelp.  I know...some people aren't sure about raw fish.  But you have to believe me...if it's quality fish, and really fresh...you might change your mind.  I had tuna, salmon, octopus, and 2 others I can't recall at the moment.  I loved it all!


I didn't get a picture of my green papaya salad...but I made it once we got back home!  I had to go to the Hong Kong Market to buy the fruit, but it was worth the trip.  Bright, fresh, and healthy...perfect for noshing on during the hot summer days. 


Here's a pic (courtesy of Yelp again) for now...
We did a lot more than just eating around town...which you can read about here.  But I would love to go back some day.  The kids would have a blast at the ski resort...summer or winter time.  While they might not appreciate all the food we had, I'm sure we could make some modifications for eateries, lol.  


Anyways...that's my food tour of Salt Lake City for ya! 


God bless your table tonight!