Wednesday, September 29, 2010

Shrimp over Creamy, Cheesy Grits

This recipe came about when I became determined to try and get more people in our house to like grits.  I'd had minor success with polenta, but I really wanted to cook grits on a more regular basis.  Most of you have this problem...you enjoy certain foods, but rarely cook them because nobody eats them except you. 

Now David will eat just about anything if I put a LOT of cheese in it.  But that adds fat and calories.  After some research...I decided to try making the grits with evoporated milk instead of water.  I still put some cheese in, but not as much as I might have, hoping the evaporated milk would give it a nice, creamy texture and great flavor.   

In addition to having an adversion to grits, only David, Rebecca, and I eat shrimp.  So I added some sausage to the recipe...now everyone else would have a protein to eat. 

Want to see if this will pass the test at your house?  Here's the recipe...it's easy, and you'd better bookmark it for Lent next spring, minus the sausage, of course. ;-)

Shrimp over Creamy, Cheesy Grits

1 cup quick cooking grits
3 cups evaporated milk
2 tablespoons unsalted butter
1 cup mild cheddar cheese
Dash of salt
1/4 teaspoon pepper

1 pound link sausage, cut into 1/2 inch pieces
1 medium onion, diced
1 tablespoon butter
2 tablespoons all purpose flour
1 teaspoon Old Bay seasoning
2 bay leaves
1 can (15 ounces) low sodium chicken broth
1 pound large shrimp, peeled and deveined
3 green onions, chopped
2 tablespoons freshly chopped parsley

We'll start with the grits...they'll stay plenty hot while you make the shrimp.  Bring the 3 cups of evaporated milk to a gentle boil and pour in the grits. 

 Stir in the salt, pepper, and continue to cook for 5-10 minutes...however long the box tells you too.  When all the milk has been absorbed, the grits are done. 

Remove from the heat and add the butter and cheese (I know...the salt and pepper were in this pic instead of the previous one).  Stir once more to incorporate all the cheese.  Put the lid on and set aside.

Heat the one tablespoons of butter in a large skillet over medium heat.  When hot, add the onion and saute until soft.  Toss in the sausage and let it brown for 5 minutes on both sides.  It's already fully cooked, so we're just going for a little little more flavor by searing it. 

Sprinkle in the flour, and stir well so your sauce won't develop any lumps.  Pour in the chicken broth and keep stirring, scraping the bottom of the pan to get up any brown bits.

Now you can add the Old Bay, bay leaf, and shrimp. 

Continue to cook for about 5-6 minutes.  When the shrimp are pink and opaque, they're done. 

Keep in mind any seafood will continue to cook on the plate, so if you undercook them just a hair, by the time you serve it, it will be finished (overcooked shrimp have a rubbery texture...which is not very appetizing!). 

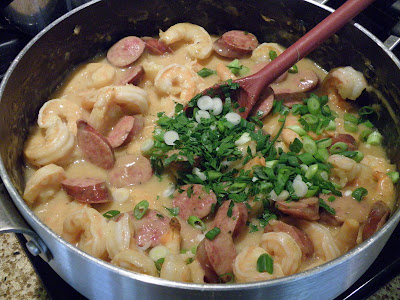
Turn off the heat, and stir in the green onions and parsley.

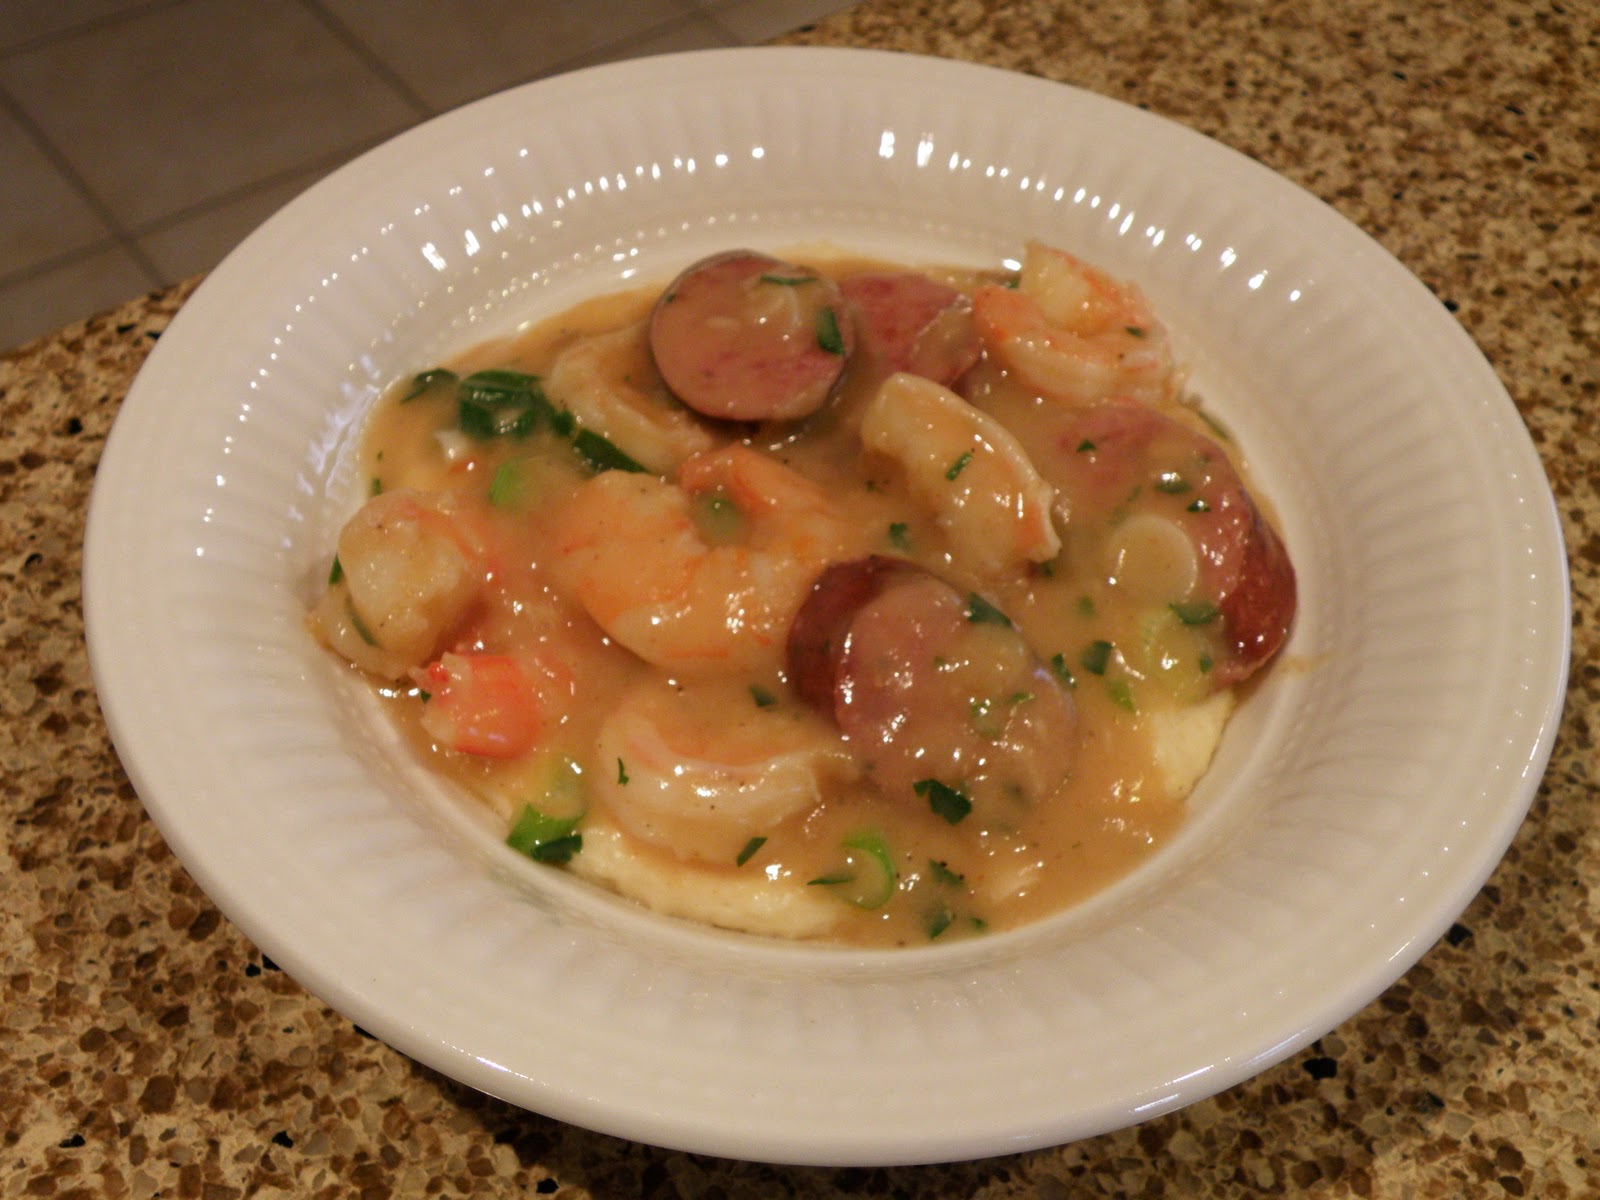
Ladle some grits in a bowl, and top with a nice serving of the shrimp and sausage mixture. 

YUM!  Wasn't that easy?  I know Paula Deen woud have used 2x as much butter, lol. 
I held my breath while David took his first bite. 

ME:  "Well, do you like it sweetheart?"

DAVID:  "You know what, the grits work.  It's good."

ME:  "So if I made it again, would you eat it?"

DAVID:  "Yes, I would.  I like it."

At that point, I wanted to jump up on the table and do a little dance but I restrained myself.  We do try and teach our kids proper table manners after all. ;-)

Rebecca said the grits were "okay."  She did like the rest though.  David had his bowl, and a second helping.  In my book, if half of our family eats it, I'll make it again. 

So...there you are, a classic dish with a little twist.  Hope you enjoy making it. 

God bless your table tonight!

Friday, September 17, 2010

Grilled Zucchini Pizza with Roasted Red Peppers and Goat Cheese

Hi everyone!  Here's yet another recipe that involves the grill.  I cannot say enough about grilling or roasting veggies.  They just taste so much better; all the natural sugars caramelize, and you get a hint of smokey flavor, which my hubby loves.  I used to steam all our fresh vegetables until I started roasting our from-the-garden green beans, and wow...they were such a hit.  I haven't used our vegetable steamer in probably 2 years.  It's sitting in my closet, waiting for it's chance to be donated to Goodwill. 

Anyone want it?  Just kidding. 

So, if you are not into zucchini, substitute yellow squash, bell peppers, whatever you fancy.  Goat cheese not your thing?  Toss on some mozzarella or fontina...I'll never know.  As you'll see, this recipe is figure-friendly, thanks to a light hand on the cheese, and a homemade, whole wheat crust.  And of course, you can make plain cheese pizza for all the picky eaters in your house (I don't have any of those you know ;-).

Grilled Zucchini Pizza with Roasted Red Peppers and Goat Cheese

1 recipe homemade whole wheat pizza dough or store bought dough
2 small or one medium zucchini, cut in half, and sliced lengthwise into 1/4 inch slices
Zest and juice from one lemon
1 teaspoon lemon dill seasoning blend
salt and black pepper
Olive oil for drizzling
1/2 cup prepared pizza sauce
1 roasted red pepper, thinly sliced
3 ounces fresh, crumbled goat cheese
1 teaspoon dried basil or oregano

Heat your outdoor grill or indoor grill pan over medium heat.  I used my indoor grill pan, and wanted to make sure the zucchini didn't stick, so I threw everything into a bag--the zucchini, lemon juice and zest, the lemon-dill seasoning and the olive oil.  Give it all a good shake to distribute the olive oil and seasonings. 

Grill for 3-5 minutes on both sides until the zucchini is lightly marked and tender,but not falling apart.  Set aside.

Preheat your oven to 400 degrees.

Divide your pizza dough into 8 equal pieces.  (I decided to make slightly larger pizzas this time, and made 6 individual pizzas instead of 8.  At this point, if you don't need all the dough, you may freeze some for later or use it right away). 

I started off making 4 cheese pizzas for the kids.  Anytime we have pizza in our house, it's inhaled!  Just stretch the dough out, spread with pizza sauce, cheese, and a sprinkling of dried basil or oregano.  Pretty easy, right?  Bake at 400 degrees for 12-14 minutes or until the crust is golden brown. 

Now let's make the pizzas for the grown-up taste buds.  Take 2 portions of dough and gently spread it out into a round shape, about 8 inches across.  Placed on a lightly greased baking sheet (or use a silpat mat if you have one).  

 Drizzle with a tiny bit of olive oil and spread on some of the pizza sauce.  Lay on about 6 slices of the zucchini--you might have to trim them a bit so they'll fit on the dough.   Next up...the roasted red pepper.  I cheated and bought a jar of roasted red peppers. ;-).  But sometimes a jar is cheaper than buying them fresh.  6-8 slices of pepper ought to do it. 

 
Place little crumbles of goat cheese, all around...don't go too crazy with it...

And sprinkle with the dried basil.  I used Penzey's Pasta Sprinkle...I just love this stuff.  But I know not everyone has it, or can get it.  Dried basil is a fine substitute. ;-)

This just begged for a close-up.  Divine veggie goodness...I can't wait to eat you up!

Now your little pizza is ready for the oven.  Bake at 400 degrees for 12-14 minutes, rotating once halfway through the baking time.  The crust should be a light golden brown, and the goat cheese will be very soft. 

It's that pretty?  A perfect way to eat your veggies and have your pizza too! 

Let stand for about 5 minutes, cut into 4 slices, and serve.

I didn't get a pic of the finished cheese pizzas, sorry.  David and I were too busy devoring our dinner, and the kids of course were busy eating too.  I didn't want to snatch their plate away to try and get a picture!

Hope you are able to get out there and grill a little more.  It's still so hot here...we'll surely be able to cook outside for a few more weeks (many a couple of months!). 

God bless your table tonight!

Tuesday, September 7, 2010

I'm Back...Grilled Pork Chops with Lemon-Shallot Chutney

Hi everyone!  I'm thrilled to be back posting recipes. ;-)  I've finally gotten over the last bit of nausea, I can go to the store without gagging, and cook almost anything (although chicken still makes me a bit squeamish). 

Anyway...

I had 3 posts in the the works before I got preggo, and made some awesome pasta with homemade pesto a week ago, so I'm hoping to get these up for you in the next week or two. 

First up, a really easy pork chop to celebrate the last bit of the grillin' season.  Here in south Texas, we can grill nearly all year round, but if you can't, don't worry.  The broiler or indoor grill pan will work just fine.  I saw this on Big Daddy's House Aaron McCargo, and knew this would be a great, quick meal for our busy family.  I also doubled this recipe, since 4 pork chops isn't quite enough for us.  Our camera card went corrupt on us, so I don't have step-by-step photos, but this recipe is fool-proof, so don't sweat it. ;-)

Grilled Pork Chops with Lemon-Shallot Chutney
(adapted from Aaron McCargo and Big Daddy's House)

4 large lemons, supremed *
2 shallots, thinly sliced
2 tablespoons fresh chopped tarragon (or rosemary)
2 tablespoons fresh chopped chives (or scallions)
3 tablespoons olive oil
Pinch of sugar (or more if your lemons are particularly tart)
Salt and black pepper to taste

4 (or more) bone-in pork chops, about 1/2 to 1' inch thick
Salt and black pepper to taste
Smoked paprika to taste (about 2 teaspoons or so)
Olive oil

Make the chutney first and let it hang out in the fridge for a while to marry the flavors. (*To supreme a lemon means to take off all the peel and white pith, and then cut away each lemon segment, much like you see a mandarin orange out of the can). 

Combine the lemon, shallots, tarragon/rosemary, chives/scallions, olive oil, and sugar in a medium bowl.  Season to taste with salt and pepper, and place in the fridge until the pork chops are ready.

Preheat your outdoor grill over medium-high heat and be sure to grease your grates well with a wad of paper towels dipped in vegetable oil.  If you are using an indoor grill pan or broiler pan, some non-stick cooking spray is fine.

Let the pork come to room temperature before you toss it on the grill, then the meat won't seize up on you...it will grill up nice and tender too.  

Trim away any excess fat, and season the chops on both sides with the salt, pepper, and smoked paprika.  Drizzle with some olive oil, and grill for about 4-5 minutes per side.  If you went with thicker pork chops, they will need a couple more minutes per side.  Just be sure not to overcook 'em.  People commonly make the mistake of overcooking pork...it should register about 155 (or just a few degrees more) on an instant meat thermometer, and the inside should be the barest shade of pink. 

Transfer the pork to a serving platter and serve immediately with the lemon-shallot chutney.
 
David and I loved the combination of smoky pork with the bright, lemony flavor of the chutney.  Rebecca loved it too...although she couldn't eat as much as the adults did.  The rest of the kids were indifferent to the chutney, but that meant more for us. ;-). 

I also had my hubby grill some roma tomatoes straight out of the garden to eat along with our meat.  Just cut 'em in half, toss with some olive oil, fresh chopped basil, salt, and pepper, and place on the grill, turning once until they are lightly grilled and soft, but not falling apart, about 5-6 minutes.  Easy and so good!

I hope you get a chance to fire up the grill a few more times and give this recipe a try!

God bless your table tonight!