 After I tried making the Whole Wheat Pizza Dough, I decided to make calzones instead of pizza. I hadn't made calzones in a long time, and thought it would be a nice change from pizza. The kids had just sausage and cheese in theirs, but I put mushrooms and spinach in ours. You can put anything you want in yours.
It's best to make the filling in the morning and put it in the fridge until you need it. Then make the pizza dough in the afternoon, since it only requires one hour of rising time. This will help you save time and not have a mad scramble to get dinner on the table. I used the dough fresh this time because I needed all of it to make 8 calzones. Next time, I will make a double batch of dough so I can freeze half--which will definitely be a time saver when we want these yummy calzones again.
Some people might think a whole-wheat dough would be tough, but this dough baked up beautifully, and it tasted great. It was really easy to work with too--nice and elastic, but sturdy enough to hold up to the calzone filling. The kids scarfed their calzones in 30 seconds flat! Okay...maybe not that fast, but I was in bed with a lovely cold, and I didn't hear any complains coming from the kitchen. So go buy a bag of whole-wheat flour and try this one out. Once you do and see how easy it is, I'll bet you'll never buy a tube of refrigerated dough again.
Calzones with Sausage, Mushrooms, and Spinach
1 recipe whole-wheat pizza dough (see recipe archive, under "breads")
1 10 ounce box frozen spinach, thawed and squeezed very dry
2 tablespoons olive oil, divided, plus more for brushing on the calzones
8 ounces white button mushrooms, sliced
salt and black pepper to taste
1 pound bulk pork sausage or sweet italian sausage
1 teaspoon each dried oregano and basil (optional)
1 jar pizza sauce
2 cups shredded mozzarella cheese/pizza cheese blend
If you haven't already, make one batch of the Whole-Pizza Dough. Divide the dough equal into 8 pieces and set them aside while you work on the filling.
Brown the sausage over medium heat with 1 tablespoon olive oil. I added the dried oregano and basil because I wanted it to taste like Italian sausage. It wasn't on sale when I went to the store, so I bought Jimmy Dean instead.
 When the sausage is done, drain on a plate lined with a couple of paper towels.
  In the same skillet, saute the mushrooms in the remaining tablespoon of olive oil. Season to taste with salt and pepper.
  Normally, you wouldn't want to add salt to mushrooms because it draws out all the water in them. But we want to take out as much moisture as possible so the calzone filling doesn't get soggy. Continue to cook the mushrooms for a good ten minutes over low heat until they are about 1/2 their original size and the pan is dry.
 The last thing is the spinach. Make sure it is completely thawed and squeezed very dry (use your hands or wring out all the water in a clean kitchen towel). Again, this is to ensure the calzone filling isn't soggy.
 Lay out all your ingredients on the counter top. My pizza sauce was in the freezer, so I had it thawed out and ready to go (in the zip-top bag). And no, it wasn't homemade...it was outta a jar :-). (I froze it so I wouldn't waste it.). Preheat the oven to 400 degrees.
 Take one ball of dough and stretch it out gently, using your fingertips and working from the center out. It should look oval in shape, and about 7 inches long and 4 inches wide (please don't go running for a ruler, these are just guidelines here!)
 Spread about 2 tablespoons of cheese on one end.
 Add 2 tablespoons of sausage and 2 tablespoons of pizza sauce.
 Now add 2 tablespoons of the spinach and mushrooms...
 followed by 2 more tablespoons of cheese (this will help bind the filling to the dough, and avoid a big air pocket as the calzone bakes). Besides, the more cheese, the better, right?
 Now gently fold over the other half of the dough, enclosing the filling.
 Pinch edges together, fold over the edge once, and then fold it over again to make sure it's sealed shut.
 Place on a baking sheet (I used a silpat mat, if you don't have one, use some no-stick cooking spray first). Repeat with the remaining dough and filling. Brush a little olive oil over the tops so they'll brown up nice and pretty in the oven.
 Bake at 400 degrees for about 12-14 minutes or until the tops are a light golden brown.
 These smell SO GOOD when they come out! Other than straight-from-the-oven cookies, there is nothing better than the smell of freshly baked bread. If you sealed the dough correctly, there should be no leakage of filling.
 Remove the calzones to a wire rack and let cool for about 10 minutes before serving. I made these earlier in the afternoon, and then just reheated them in the oven for dinner. Like I said at the beginning of this post, I felt a cold coming on, and it hit me full force by the evening. Luckily, I tried one calzone beforehand.... :-).
 Rebecca begged me to make these again soon, and I definitely will. They were a hit!


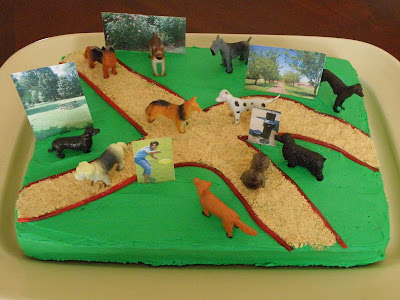
 Now just place the dogs and the pictures on the cake and you're done!

 As you can see, Gabriel's eyes lit up when he saw his cake. He need a bit of help blowing out his candles, but he dug right into his piece of cake, and ate it up! That's our boy!
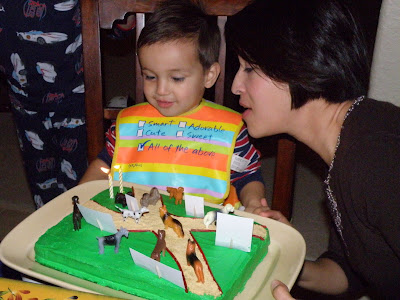

 Happy Birthday Gabriel!


 Stir this all together gently with a large spoon until a sticky dough forms.
 Remove from the bowl, and have your hubby pour about 1 tablespoon of olive oil into the bowl (or dump it out on the counter for a minute and oil your bowl). Spread the olive oil around, and put the dough back in, turning to coat. I did it this way because I was lazy and didn't want to wash 2 big mixing bowls ;-).
 This is what it should look like after the rising time is up.
 Sprinkle a little flour on your work surface. Turn the dough out, and knead it about 6-8 times. Kneading is easy...just fold the dough in half and push it away from you with both hands, turn it 45 degrees, and repeat. It should only take about a minute. Here's the dough ready to go.
 This is enough to make 2 large pizzas (about 10 inches across), 8 individual sized pizzas, (about 5 inches across), or 8 calzones. To freeze the dough, divide it in half, and place in the freezer until firm. Thaw in the fridge overnight before using.


 Cream together on medium speed until the mixture is light and fluffy.
 Add the flour mixture to the sugar mixture in the mixer in about 4 increments, and mix until the flour is all incorporated. Stir in the chocolate chips by hand.
 Angel Boy must have smelled the chocolate because the minute I opened the bag, he came running. So of course I gave him a few chocolate chips :-).
  Cover the bowl with some plastic wrap and put it in the fridge for about 2 hours. This will make it easier to scoop out the cookies later. You can bake the cookies right away if you are pressed for time.
 Bake for about 12-14 minutes at 350 degrees. Rotate your cookies halfway through. Once your oven gets nice and hot, you'll likely need to bake the cookies for about 12 minutes (and maybe even only 11 minutes. Oven temps vary greatly, so just keep an eye on them).

 Serve these with a cold glass of milk, and you might feel like the world's greatest mom! My kids think so, (even after I taught Joshua how to clean his bathroom yesterday). Enjoy!


