David loves balsamic vinegar, and doesn't mind me using it in my cooking. I saw a recipe using balsamic vinegar as a glaze for veal chops and wanted to try it. Well, veal chops are really pricey, but pork chops are very affordable...especially when your hubby has a good eye and buys them on sale.
I already knew balsamic glaze gives a tangy and sweet flavor to dishes, even more so if you gently boil it down into a thin syrup. This makes it thicker as well, and easier to use.
About the polenta...I'm a Southern girl, and I love grits. Polenta is just like grits, only the grains are much finer. Now David does not like grits, period. But he tried polenta, and he told me he'll eat it, as long as I put some butter and cheese in it.
And I'll admit...I've never cooked kale until now. But kale is relatively cheap, easy to cook, and very nutritious. And cooking it is a breeze, so don't be afraid of it!
One final note...if you don't like the smell of vinegar, you may not like cooking this. The whole house smelled like vinegar afterwards (which I don't mind, but Joshua was complaining about it while he did his homework in the kitchen).
Balsamic Glazed Pork Chops with Wilted Kale and Polenta
1/3 cup balsamic vinegar
4 tablespoons lemon juice (fresh or bottled)
1 1/2 tablespoons Worcestershire sauce
2 teaspoons honey
2 teaspoons Dijon mustard
5 bone-in pork chops
Salt and black pepper
1 small bunch fresh kale, washed and patted dry
2 cloves garlic, thinly sliced
2 teaspoons olive oil, divided
1 box instant polenta
2 tablespoons butter
1/4 cup grated Parmesan cheese
To prep the kale, lay the leaves out on a cutting board and slice into 1 inch pieces (just as you might cut lettuce). The stems are very tough, so discard the bottom part (about 4-5 inches).


For the balsamic glaze, combine the vinegar, lemon juice, Worcestershire sauce, honey, and Dijon mustard in a small pot. Bring the mixture to a gentle boil.
 Let the glaze cook for about 10 minutes, until it becomes a bit thick and syrupy; it should just coat the back of a spoon, and leave a clean path if you run your finger through it.
 Now we'll cook the pork chops. Heat one teaspoon of olive oil in a large, non-stick skillet. (I like to trim all the visible fat from the chops. I always make sure to keep this darker pink piece--I'm sure Alton Brown could tell you exactly what muscle it is, since I haven't a clue. But this part cooks up more tender than the rest of the chop, and I save it for Gabriel.)
  Season the pork chops on both sides with salt and pepper, and brush them with the balsamic glaze. When the pan is ready lay the pork chops in, and brush the exposed side with a little more of the balsamic glaze.
  Cook the pork for about 5 minutes per side, and brush with the glaze one more time after you flip them.
 Remove to a plate, cover with foil, and keep warm while you finish the rest of the dish.
  Now if you were thinking ahead, and put some of the glaze in a separate bowl to use on the pork chops (to avoid contamination), you can skip this step. I wasn't thinking, so the brush I used on the raw pork chops went back into the pot...oops. So if you did what I did, pour the glaze into the same skillet you used to cook the chops. Bring it to a boil, and make sure to boil it for a full 5 minutes to kill any bacteria. Scrap up any browned bits from the bottom of the skillet.
 This can be used as a sauce to serve with the pork. It's really full of flavor now!
 For the polenta, just make it according to the directions on the box. I made 1/2 a box, since only David and I eat it. Just be sure to add the polenta to the boiling water a little at a time, and stir it continuously with a whisk, or it will lump on you (this is why I couldn't take any pics until it was done). After the polenta has absorbed all the water, season with some salt, the butter, and the parmesan cheese. Put the lid on the pot, and remove from the heat--it will stay hot for a good 15 minutes or so. If it's too stiff when you're ready to serve, just reheat it along with about 1/4 cup of water, and it should be nice and smooth again.
  In another large-nonstick skillet, heat the remaining teaspoon of olive oil. Add the garlic and saute it for a couple of minutes. Be careful not to let it burn!
 Add the kale and cook for about 8-10 minutes.
 You will need to add a splash of water every couple of minutes so the kale will steam and wilt down. It will still remain quite crisp (David said he actually liked the crunch, more so than the sauteed spinach I make).
 Season to taste with salt and pepper and remove from the heat.
To serve, spread a few spoonfuls of polenta in a circle on a plate. Top with a serving of kale, one pork chop, and a little of the balsamic vinegar sauce. Or you can just pile it up on the plate :-).
David LOVED this. He put a little more of the sauce on his plate (I told you he likes balsamic vinegar!), and was sad he couldn't take any leftovers to work the next day (he had a lunch meeting). So lucky me got the last pork chop--yum! The kids like it too, (they had carrot sticks instead of the kale), but even Joshua said it was okay--since he said the house still didn't smell good :-).
Let me know if you try cooking with kale...I'd love some more recipes using it.
God Bless your table tonight!

 David and I are not the biggest football fans, but I don't need an excuse to cook up something fun to eat while we watch the Superbowl this weekend :-) However, I don't want to completely sabotage David's efforts to lose weight. I subscribe to just one food magazine Everyday Food because all of the recipes are simple, easy, and inexpensive to make. Plus, every January, they come out with a "light" issue that is great to refer to since we're coming off the holidays, and want to eat healthier for a while.
  All-righty, you should be all set! Have fun watching the game on Sunday!

 Chop into small pieces and set aside.


 Here's the finished dish!

 I highly recommend you do the same. (One time I didn't do it and I got a nasty grease burn on my hand from trying to turn over a large piece of fish.)
  I have to say one time, I didn't have enough mustard powder and ended up using some curry powder; it was great and worked just fine.
  You don't want to let the coating sit, otherwise it gets too wet from the moist fish, and it won't have a nice sear when you cook it.
  gently turn it over, and cook on the other side for another 4-5 minutes. I just watch it carefully, and when I see that the flesh is opaque, I know it's done.


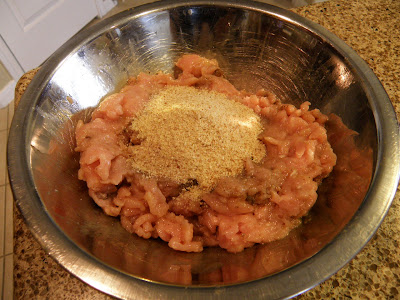 And BTW, the mixture will feel pretty wet until the bread crumbs go it, then the meat will get rather pasty and sticky.


 Here's the crushed cereal...do not attempt at home...repeat...it's no good people!
 And here's the sauce in the works...it only held a hint of orange flavor and the promise of tasting like...well...like chicken broth (which was one of the ingredients).
  See...it doesn't look bad. I liked the fact you can see the bits of orange zest in it.
  But the only thing good on this plate was the broccoli and the orange slice for the garnish (assuming you like roasted broccoli). Now we have to eat the leftovers tonight :-(
 When the pan is hot, add the chicken, and cook for 2-3 minutes.
 Turn the tenderloins over and cook for another 2-3 minutes. Remove to a plate and set aside.


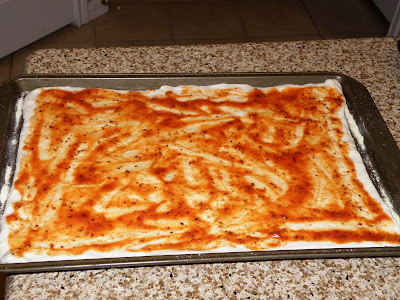
 I don't like to use cooking spray to keep the pizza dough from sticking...it makes the crust wet and greasy. If you use cornmeal, it keeps the dough from sticking and gives the crust a nice little crunch.
 Stretch it out with your hands until it fits the pan. As the dough warms up, it will become easier to pat out...so be patient and just work with it. If it doesn't go quite to the edges of the pan, don't worry about it. If you think it might be sticking while your patting it out, sprinkle some more cornmeal under the dough. This is one time you don't want to skimp on the cornmeal.