

Happy Birthday Jesus Cake
1 box cake mix
Vegetable shortening and flour for greasing cake pans
FOR THE FROSTING:
4 cups powdered sugar (about 1 pound)
TO DECORATE:
Graham cracker crumbs
Miniature nativity set
Gel food coloring of choice
Bake the cake in two cake pans according to the box instructions. Make sure to grease the cake pans with shortening and flour, even if your cake pans are non-stick. You will save yourself one big headache if you do. Leave the cakes in the pans for 10 minutes after baking,

 Now for the frosting...in a stand mixer bowl, beat the butter and shortening together on medium speed. Add the vanilla extract. Then add the powdered sugar, one cup at a time, beating well after each addition. You will need to scrape down the bowl several times to make sure all the sugar is well incorporated. It will appear dry, but don't worry! Add the milk, one tablespoon at a time, beating well, and scraping the bowl as necessary. The frosting should look light and fluffy.
 Reserve 1/3 cup of frosting for the lettering. Place one cake layer on a pedestal or serving plate. Tuck 4 strips of wax paper under the cake so you won't get frosting all over the place.

 Place the second cake layer on top...
 and then use the rest of the frosting to cover the top and sides. Don't worry about making it look professional...I just use my offset spatula, and make it as smooth as possible. If there's a spot here and there, I don't obsess over it. After all, my kids don't care...all I have to say is, "Chocolate cake" and they come running :-).

Take a couple of spoonfuls of graham cracker crumbs and spread them in a circle on the top of the cake. This will keep your nativity set from sinking too deeply into the frosting.


Then send that child off to inform the rest of the kids...which she promptly did. Everyone got their own spoon to lick, including Gabriel, lol.
Okay, back to the cake! Tint the reserved 1/3 cup frosting whatever color you like (we did ours in blue), and pipe, "Happy Birthday Jesus" around the edge of the cake. (You can see how I used a zip-top bag for piping decorations on my Gingerbread Cookies).

Set the miniature nativity set in the middle of the graham cracker crumbs. Ours is simply a little craft kit that came from Oriental Trading Company. Wait a couple of hours for the frosting to set, then remove the waxed paper strips.  We sang "Happy Birthday" to Jesus after dinner last night. The kids all happily consumed a piece of cake.
 This is a simple, special cake to make for Christmas...I hope you make one for your family.
God bless your table tonight!


 Divide the dough in half, and sprinkle one portion with a little flour.


 Now slide on the metal tip you want to use, and screw the coupler on. All done! See...easy, right?
 Aren't they CUTE? They're sure to be a hit with your kiddos too...mine had already eaten some by the time I published this post, lol. I hope you try this recipe out!

 Take one of the triangles and lay it out on your work surface. Take one little sausage, and lay it in the middle.
 then fold the other corner over, just like you're swaddling a baby :-).
 The dough should be snug around the sausage, but not tight. Now pinch the end closed, so the end of the sausage is enclosed-- you shouldn't see it at all.
  Place on an ungreased cookie sheet and repeat with the rest of the crescent dough and sausages. Bake at 375 degrees for 12 minutes, or until the little babies are a nice golden brown.
 Serve warm with your condiment of choice. We like honey mustard or barbecue sauce.
 These were devoured at my sister's party...I was sure there would be some left, but one of my uncle's kids probably ate half of them, and I made 32! Oh well!

 Add the eggs, extract, and milk. In a medium bowl, whisk the flour, baking powder, and salt together. Add this to the mixer in about 3 increments, so you don't have flour flying everywhere. Turn the dough out onto a couple of pieces of plastic wrap. Push the dough together into a flat disk, and refrigerate for about 3 hours. I like to make this first thing in the morning, and then bake the cookies that afternoon or the next day.
 Sprinkle some flour out on your work surface, and dust some more on top of the dough. Try not to use too much flour...it will make the cookies tough if they pick up too much flour while you're rolling and stamping them out.
  Roll out the dough to about 1/4 of an inch thick. I probably roll mine about 1/8 of an inch. Just experiment to see what works best for you. Turn the dough a couple of times while you roll it out, just to make sure it's not sticking.
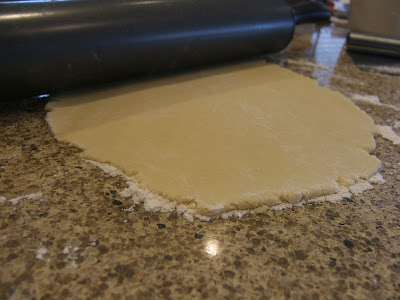 Stamp out your cookies, and transfer them to your cookie sheets. I much prefer to use non-stick cookie sheets; greasing baking sheets between batches would be a major pain. I have an assortment of cookie cutters, which were picked by the kids.

 If your dough seem too soft to work with, stick it in the freezer for about 10-15 minutes, and then try again. It was so warm and humid the day I made these, and my dough was pretty soft, but a quick trip to the freezer saved the day. I put the dough in the freezer in between batches as well, and it worked great.
 Transfer the cookies to a rack to finish cooling. I stacked these up after they cooled completely.


