
 I got this recipe from my mother-in-law years ago. I've been making them ever since. I've tried making gingerbread cookies, but they just don't hold a candle to this recipe. These molasses cookies taste like fall--dark, spicy, and just the right amount of sweetness with the frosting. The frosting is really an icing, and it's THE BEST icing I've ever used (yes, the recipe is from my mother-in-law too--thanks Mom!). It is a breeze to make, and I just love the spreading consistency.
A couple of notes...don't be deterred by the spices in this cookie. You'd think 4 different spices would compete with each other, but they really all meld together. My kids have always loved these, especially when I use acorn and leaf cookie cutters. The icing may get a bit stiff after it sits out for a while. If it does, just add a couple of drops (yes...drops...seriously, it only takes a tiny bit!) of water, and it will thin it out nicely and become spreadable again.
Frosted Molasses Cookies
COOKIES:
2 cups all purpose flour
1/2 teaspoon salt
1/2 teaspoon baking soda
1 teaspoon baking powder
1 teaspoon ground cloves
1 1/2 teaspoon cinnamon
1/2 teaspoon nutmeg
1 teaspoon ground ginger (I usually cut this back to 1 1/2 teaspoons)
1/2 solid vegetable shortening
1/2 cup sugar
1 egg yolk (save the white for the frosting!)
1/2 cup light unsulphured molasses
FROSTING:
1 1/4 cups powdered sugar
1/8 teaspoon cream of tarter
1 egg white
1/4 teaspoon pure vanilla extract
Colored sugar (optional)
In a large bowl, combine the flour, salt, baking soda, baking powder, cloves, cinnamon, nutmeg, and ginger, set aside.


In the mixer, combine the shortening, sugar, and molasses until creamy and well blended.
 Add the egg yolk and mix well. Blend in the flour in about 4 increments so you don't have flour flying all over the place.
Add the egg yolk and mix well. Blend in the flour in about 4 increments so you don't have flour flying all over the place.
The dough will be very stiff and thick. Turn out into a clean bowl, cover, and refrigerate for about 2 hours. This will make the dough much easier to roll out later.

When the dough is ready, take it out of the fridge, divide it into about 4 pieces. Work with one piece at a time, and keep the rest chilled until needed. Preheat the oven to 350 degrees.

On a lightly floured surface, roll the dough out to about 1/4 inch.

Dip your cookie cutters into some flour, and stamp out your cookies. I used these particular cutters that I found at Walmart about 3 years ago.
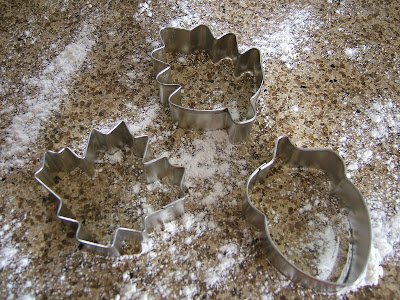

Place about 1 inch apart on an ungreased cookie sheet.
 I use this pastry scraper to lift the cookies onto the cookie sheets.
 I don't even know where David got it--I found it in my stocking about 5 Christmases ago. But I can't live without it now. You have to get one if you make cutout cookies. It holds the cookie together while you pull away the excess dough and makes transferring a piece of cake.

 Bake the cookies for 8-10 minutes or until barely brown around the edges. In my oven, 9 minutes is just right (your will differ from mine, so just keep an eye on the first batch).
Let cool on the baking sheet for 1 minute, then transfer the cookies to a rack to cool completely. Repeat with the remaining dough. Try not to use too much flour while you're rolling out the cookies--too much flour makes cookies tough.

Now, for the frosting. In the mixer, combine the powdered sugar and cream of tarter. Add the egg and vanilla extract. Beat on low speed until all the sugar is incorporated (you will need to scrape the bowl down once or twice to expedite the process).
 Turn it up to high speed and beat until the frosting is so stiff, a knife drawn through the mixture cuts a clean cut path. I hope you can see that in the following picture.
 My original recipe says this is similar to a Royal icing, but it doesn't set up as quickly. You will still want to frost the cookies right away before the frosting gets stiff. If it does, stir in a couple of drops of water until it's a nice spreading consistency again.
Turn it up to high speed and beat until the frosting is so stiff, a knife drawn through the mixture cuts a clean cut path. I hope you can see that in the following picture.My original recipe says this is similar to a Royal icing, but it doesn't set up as quickly. You will still want to frost the cookies right away before the frosting gets stiff. If it does, stir in a couple of drops of water until it's a nice spreading consistency again.Since I used acorn and leaf cutouts, I colored my frosting with brown, yellow, and orange gel colors.
 I really like using the gel colors by Wilton, they don't dilute your frosting/icing like the liquid colors do.
 Here's a website from Wilton's website about coloring your icing.
I really like using the gel colors by Wilton, they don't dilute your frosting/icing like the liquid colors do.Here's a website from Wilton's website about coloring your icing. Another must have kitchen tool when frosting cookies, cakes, etc, is an offset spatula. I have one (and really want another, bigger one). If you don't have one, maybe Santa will put one in your stocking this year (aka, ask the hubby for one!).
Anyway, frost your cookies, and sprinkle with colored sugar while the icing is still wet (this is optional). I found a fall sugar mix containing yellow, red, and orange sugar, so that's what I used. I could have used turbinado sugar for the acorns (since it's a brown color), but I forgot to buy some, so I left them as they were with just brown frosting.


 Wait until the frosting is completely dry and rock hard before putting the cookies into an airtight container (or cute little bags like I did for our bake sale).
Enjoy a taste of fall! God bless your table tonight!


 Add the salt, pepper, and milk.
 Milk makes the egg cook up light and fluffy. Scramble the mixture together with a fork.
  Once the egg isn't runny anymore, and it's set, use the spatula to fold the egg in half, and then into quarters. If the though of flipping the egg sends you running for the hills, relax. You can also just turn the egg out onto a plate, and fold it twice with a couple of forks. See...that wasn't so hard was it?


 When the stock is ready, add the chicken thighs, reduce the heat to medium, and simmer for 12-15 minutes. Remove the chicken to a plate and let cool.
 Using bone-in chicken gives a richer flavor to the boxed chicken stock--trust me! I bought the chicken on sale for 99 cents a pound, so I don't mind the extra step of removing the skin to save money.
 Use your kitchen shears to cut the tomato slices into thin strips--it's tough to do with a knife.
 If you don't have kitchen shears, please go get some! I use them for everything, snipping fresh herbs, cutting packaging open, getting
  After 10-15 minutes, add the chicken to the pot, along with the corn and lime juice. Then add 2 tablespoons of the cilantro. I use just the leaves because I don't like biting into a stem of cilantro.
 Spray a large baking sheet with cooking spray and lay out the tortilla wedges in a single layer. Spray again lightly with the cooking spray and sprinkle with the kosher salt.
 Bake at 375 degrees for 10 minutes or until lightly golden brown.
 Watch them carefully, you don't want them too dark. Take them out and let them cool on a plate. Repeat with the rest of the tortilla pieces. You can do this earlier in the day like I did, and store the finished chips in an airtight container until you're ready to use them.
  The last thing to do is to prep the avocado. Use a sharp knife to cut it in half, and twist gently to separate the halves. Hit the pit with the blade of the knife (sorry, there was no way I could get a picture of this step), and lift it out. Now cut the flesh into cubes like this:
 take a spoon, and scoop out all the pieces. If for some reason you don't get it into your bowl right away, toss the avocado with a little lime juice so it doesn't oxidize and turn brown on you.

 We like our beans with a lot of crunch, so if you like yours a little softer, cook them for a few extra minutes. When they're done, shake off the excess water and dump them into a serving bowl.
  Microwave on "high" for 1 minute or until the butter and marmalade have melted.


