Monday, March 2, 2009

Asian Beef Stir-Fry

Well, I did say I would try to make more Chinese food this year. So here's another stir fry recipe. My family is getting a tad tired of rice (and it's not David's favorite thing, even with meat and vegetables), so this will probably be the last Chinese recipe for a few weeks.

I found the original recipe online, but I always read the reviews for a recipe before trying it out--many of them said to double the sauce, (which I did) and they were right. I also remembered my mom always marinated her meat beforehand, so I came up with a marinade for the beef and included it in this post.

This turned out great...whenever I eat in a Chinese restaurant, my dish often comes with too much sauce, and it's thick and gloppy--yuck! But this sauce was perfect--just the right consistency to coat the vegetables and meat without being drowned.

I know it looks complicated, but you can prep the beef, vegetables, and sauce in advance. I couldn't just list all the ingredients without organizing it...I was afraid you'd be confused.

So here is another healthy stir-fry recipe to dig your chopsticks into!

Asian Beef Stir-Fry

FOR THE BEEF:

1 pound beef round steak
3 tablespoons low-sodium soy sauce
1/2 teaspoon sesame oil
2 tablespoons mirin or rice wine
1 teaspoon brown sugar

FOR THE RICE:

1 cup white or brown rice
1/2 teaspoon salt
2 cups water

FOR THE STIR-FRY

2 tablespoons vegetable oil
1 red/green bell pepper, sliced
1/2 cup red onion, thinly sliced
1 heaping cup (8 ounces) snow peas, trimmed
1 tablespoon minced fresh garlic
1 tablespoon minced fresh ginger
salt and black pepper to taste

FOR THE SAUCE:

6 tablespoons soy sauce
4 tablespoons mirin/rice wine
2 tablespoons brown sugar
1 teaspoon cornstarch

We're going to start with the beef. Trim away any excess fat and stick the meat in the freezer for about 30 minutes. Partially freezing the meat makes it easier to slice it very thinly. We want this beef to cook quickly so it stays tender. Once the beef is partially frozen, lay it out on your cutting board.

Cut it in half lengthwise.

Then cut it at an angle into slices about 1/8 of an inch thick. Leave the meat out on the board for about 10 minutes to warm up just a tad while we mix up the marinade.

In a large zip top bag or container, combine the soy sauce, sesame oil, rice wine, and brown sugar. I bought my rice wine at the Asian market. If you can't find something similar at your local grocery store, you can use a dry sherry (don't use a "cooking wine" or "cooking sherry," they taste awful!). This is the brand of rice wine I buy.

Add the sliced beef and turn to coat. Refrigerate for 6-8 hours or overnight.

About 30 minutes before you want to serve dinner, start the rice. Combine the water, rice, and salt in a medium pot. Bring to a boil over high heat.

Once it's boiling, turn the heat down to low and let it simmer gently with the lid cracked until all the water is absorbed, about 12-14 minutes.

Put the lid on and set aside--it will stay warm until the stir-fry is ready.
Stir all the sauce ingredients together and set aside.

Have all your ingredients prepped and ready to go. Remember...stir-fry goes quick!

Heat your wok over high heat. If you you're using a non-stick skillet, you can only heat that up to medium (maybe medium-high). Pour in the vegetable oil and let it heat up. When you see the oil starting to ripple and smoke just a bit, then the pan is ready.

Add the beef to the pan--away from you, because this baby is going to ROAR back at you, since it's really hot. Use a long handled spoon to stir the beef briskly until it is about 3/4 of the way done. Remove the beef to a bowl and set aside. (Notice that it's still a tad pink--this is fine, because it will finish cooking with the vegetables).

Put the wok back on the heat and turn the heat down to medium. If you think you need it, add just a bit more oil to the pan. Add the garlic and ginger and stir that around for about a minute. Don't let it burn!

Toss in the snow peas (yes, they're from the garden), red pepper, and red onions. Let them cook together for about 5 minutes--you want them fairly crunchy.

Now put the beef back in...

Pour in the sauce (give it a good stir before you use it, since the cornstarch has probably settled), and let it simmer along with the beef and vegetables for a few minutes. It should thicken and coat everything nicely.

Give the pan one final stir and turn the stir-fry out into a nice big bowl.

Doesn't it look great? To serve, scoop some rice into a bowl, and add a generous portion of the stir-fry.

All you have to do is get your chopsticks (or a fork--I'll never know), and dig in.

God bless your table tonight!

Friday, February 27, 2009

Cheap Meal Ideas

David saw an article about this sweet lady on www.spiritdaily.com/. You have to watch her on YouTube. Here's a sampling--the show is called Depression Cooking with Clara.


Since we're trying to watch our food budget, I plan to watch all her episodes at some point. I figure a 91 year great grandmother who grew up during the Great Depression ought to know a thing or two about cooking frugal meals.

Thursday, February 26, 2009

Recipes for Lent

Every Friday, I hope to post a meat-free dish for all my fellow Catholics out there. In the meantime, here's a list of possibilities from my archives. (And don't forget--pancakes, waffles, or eggs are great for dinners too during Lent. You could also make veggie pizza/calzones, pasta, or salad without meat).
And if you need more ideas, look no further than the Internet. My favorite websites to browse for ideas and recipes are:


I really like allrecipes.com because it's easy to search for recipes, plus they have reviews of nearly all of them...people are not afraid to tell you what they liked/disliked about a particular dish. I like foodnetwork.com, however since those recipes are by chefs, they are sometimes too complicated for my taste. But I do come across really great ideas and often adapt a recipe to suit me.
So don't worry, the next 40 days will be a breeze...and I'll be there right along with you :-)

Wednesday, February 25, 2009

Slow Week

I haven't been cooking much this week, mainly because I made a pork roast last Friday that made enough for 3 meals, David and I got to go to a basketball game Sunday night, we have to abstain from meat Wednesday and Friday, and we have 2 potluck dinners this week. So I decided to just be a bit lazy, but I will share with you the recipes I'm using this week in case you need an idea.

In the past week, I've made (or plan to make)

Broccoli Cheese Casserole

Mustard Seared Salmon

Fast and Friendly Turkey Meatballs

Nanny's Spaghetti Sauce
(to go with the meatballs)

Hope y'all don't mind me slacking a bit...half of us have the sniffles too, and I find myself busy holding Angel Boy a lot the past few days. If I end up taking pics, I promise to post them later on.

Saturday, February 21, 2009

Dog Park Cake

Somehow, I overlooked this post...I know, my own child's birthday cake...and a month late at that. Sorry...I guess I was too preoccupied while David was job hunting. I'll keep this post up for a week, and then I'm going to archive it and change the post date (so it looks likes I didn't post it so late, lol).

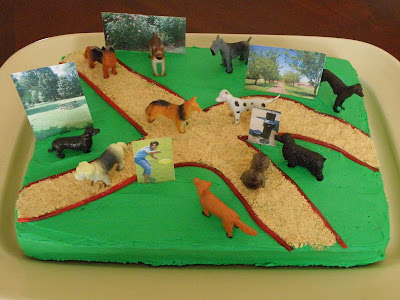
Speaking of David, this cute cake was his idea. I found the tiny plastic dogs at a party supply store; they were in a pack of 12 for $2.50. In the past, we've ordered our cakes, since I am not the most creative person when it comes to cake decorating (for proof, click here). We decided not to do that, because making your own cake is always cheaper.

If your little one likes dogs like Gabriel does (he's obsessed), this is the cake for them!

Dog Park Cake

1 box cake mix
Ingredients called for on the box of cake mix
1 batch Wilton butter cream frosting (for recipe click here)
Green food coloring (I prefer the gel or paste colors)
1 package Twizzlers Pull-n-Peel candy
1 cup graham cracker crumbs
Various printouts of park scenery (you'll see, don't worry!)
Flat/round toothpicks
Clear tape

The first thing you'll want to do is bake the cake according to the directions on the box in a 9x13 cake pan. I made a chocolate cake, but you can make your child's favorite flavor. In our house, it's all about the chocolate baby! Let the cake cool completely.

Now just google some images that appeal to you. I found these on the internet, shrunk them down to about 20% of their original size, and printed them out in color on card stock. Then you just cut them out and tape them to some toothpicks.

Here we have some lovely trees, shrubs, flowers, a freaky looking guy throwing a frisbee, and a doogie-sized water fountain. This cake is going to the dogs...I mean, to my angel boy!

I wish I could draw these out...stamp them...anything like that, but I've already told you I can't draw a lick (for proof, here's another cake I made with printouts off the internet).

Make the butter cream frosting, tint it green (add the green gel coloring a little at a time until you get the shade you like), and set it aside.

Carefully place the cooled cake on a serving platter, and slide strips of wax paper under all four sides. This will keep the platter nice and clean while you frost the cake.

Now frost the cake with the frosting...it doesn't have to be perfect. Use the Twizzlers candy (separate it into individual strands first), make some paths in the frosting, then fill them in with the graham cracker crumbs.

Here's a pic of the dogs...aren't they cute?

Now just place the dogs and the pictures on the cake and you're done!

I'm sorry I didn't take more pics of the process...I was in a bit of a hurry to get this done during naptime. Here are some pictures of the finished cake. It really is easy...you can do it!

As you can see, Gabriel's eyes lit up when he saw his cake. He need a bit of help blowing out his candles, but he dug right into his piece of cake, and ate it up! That's our boy!
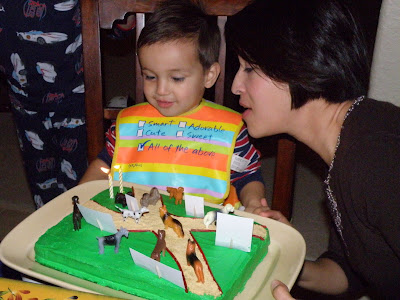
Happy Birthday Gabriel!

God bless your table tonight!

Thursday, February 19, 2009

Calzones with Sausage, Mushrooms, and Spinach

After I tried making the Whole Wheat Pizza Dough, I decided to make calzones instead of pizza. I hadn't made calzones in a long time, and thought it would be a nice change from pizza. The kids had just sausage and cheese in theirs, but I put mushrooms and spinach in ours. You can put anything you want in yours.

It's best to make the filling in the morning and put it in the fridge until you need it. Then make the pizza dough in the afternoon, since it only requires one hour of rising time. This will help you save time and not have a mad scramble to get dinner on the table. I used the dough fresh this time because I needed all of it to make 8 calzones. Next time, I will make a double batch of dough so I can freeze half--which will definitely be a time saver when we want these yummy calzones again.

Some people might think a whole-wheat dough would be tough, but this dough baked up beautifully, and it tasted great. It was really easy to work with too--nice and elastic, but sturdy enough to hold up to the calzone filling. The kids scarfed their calzones in 30 seconds flat! Okay...maybe not that fast, but I was in bed with a lovely cold, and I didn't hear any complains coming from the kitchen. So go buy a bag of whole-wheat flour and try this one out. Once you do and see how easy it is, I'll bet you'll never buy a tube of refrigerated dough again.

Calzones with Sausage, Mushrooms, and Spinach

1 recipe whole-wheat pizza dough (see recipe archive, under "breads")
1 10 ounce box frozen spinach, thawed and squeezed very dry
2 tablespoons olive oil, divided, plus more for brushing on the calzones
8 ounces white button mushrooms, sliced
salt and black pepper to taste
1 pound bulk pork sausage or sweet italian sausage
1 teaspoon each dried oregano and basil (optional)
1 jar pizza sauce
2 cups shredded mozzarella cheese/pizza cheese blend

If you haven't already, make one batch of the Whole-Pizza Dough. Divide the dough equal into 8 pieces and set them aside while you work on the filling.

Brown the sausage over medium heat with 1 tablespoon olive oil. I added the dried oregano and basil because I wanted it to taste like Italian sausage. It wasn't on sale when I went to the store, so I bought Jimmy Dean instead.

When the sausage is done, drain on a plate lined with a couple of paper towels.

In the same skillet, saute the mushrooms in the remaining tablespoon of olive oil. Season to taste with salt and pepper.


Normally, you wouldn't want to add salt to mushrooms because it draws out all the water in them. But we want to take out as much moisture as possible so the calzone filling doesn't get soggy. Continue to cook the mushrooms for a good ten minutes over low heat until they are about 1/2 their original size and the pan is dry.

The last thing is the spinach. Make sure it is completely thawed and squeezed very dry (use your hands or wring out all the water in a clean kitchen towel). Again, this is to ensure the calzone filling isn't soggy.

Lay out all your ingredients on the counter top. My pizza sauce was in the freezer, so I had it thawed out and ready to go (in the zip-top bag). And no, it wasn't homemade...it was outta a jar :-). (I froze it so I wouldn't waste it.). Preheat the oven to 400 degrees.

Take one ball of dough and stretch it out gently, using your fingertips and working from the center out. It should look oval in shape, and about 7 inches long and 4 inches wide (please don't go running for a ruler, these are just guidelines here!)

Spread about 2 tablespoons of cheese on one end.

Add 2 tablespoons of sausage and 2 tablespoons of pizza sauce.

Now add 2 tablespoons of the spinach and mushrooms...

followed by 2 more tablespoons of cheese (this will help bind the filling to the dough, and avoid a big air pocket as the calzone bakes). Besides, the more cheese, the better, right?

Now gently fold over the other half of the dough, enclosing the filling.

Pinch edges together, fold over the edge once, and then fold it over again to make sure it's sealed shut.

Place on a baking sheet (I used a silpat mat, if you don't have one, use some no-stick cooking spray first). Repeat with the remaining dough and filling. Brush a little olive oil over the tops so they'll brown up nice and pretty in the oven.

Bake at 400 degrees for about 12-14 minutes or until the tops are a light golden brown.

These smell SO GOOD when they come out! Other than straight-from-the-oven cookies, there is nothing better than the smell of freshly baked bread. If you sealed the dough correctly, there should be no leakage of filling.

Remove the calzones to a wire rack and let cool for about 10 minutes before serving. I made these earlier in the afternoon, and then just reheated them in the oven for dinner. Like I said at the beginning of this post, I felt a cold coming on, and it hit me full force by the evening. Luckily, I tried one calzone beforehand.... :-).

Rebecca begged me to make these again soon, and I definitely will. They were a hit!

So there you are...calzones. Easy and delicious. Give 'em a try!

God bless your table tonight!

Tuesday, February 17, 2009

Paula Deen

If you've been reading my blog from the start, you'll know that I love Paula Deen. I cannot quite cook like her (sometimes there is too much butter involved!), but she reminds me so much of Georgia, where I was born, and I hope to go back and visit some day. And please don't laugh, but I love her accent too...it's one of the things I miss the most. I have lived in 4 different states, and nowhere else do people talk the way they do in Georgia. People in Georgia are truly the nicest, most down home folk I've ever known. I love Texas, and wouldn't want to move, but I still have a Georgia heart.

So you might notice I have Paula Deen's website on my blog roll (I can't believe I didn't discover it until now!). I am excited to be able to check her site from time to time.

Now you know another minor (maybe moderate) obsession of mine, 'cause I admit it...I am a big fan.