Friday, July 20, 2012

Fig Pizza with Prosciutto, Caramelized Onions, and Goat Cheese

 David came home with a jar of whole, preserved figs last week.  I've never used them before, so I hit the internet to see what recipes would pop up.  I saw one for a pork roast, but we just finished off these pork chops...so I didn't want to put more on the table.  I'd seen recipes for fig pizza before, and decided to try it, since it would be simple, and I could have a cheese/pepperoni option for the kids.

So I made this over the weekend, and I'm tellin' you...it was delicious.  The only part that was time consuming were the onions.  I probably cooked 'em for about an hour.  Caramelized onions can't be rushed...but they are so worth it if you've got the time.  And if you don't have whole, preserved figs, fig preserves are a fine substitute. 

Fig Pizza with Prosciutto, Caramelized Onions, and Goat Cheese

One recipe homemade pizza dough, or 1 tube refrigerated pizza dough (we like the "thin" crust)
2 medium or one large red onion, thinly sliced
1 tablespoon olive oil
About 16 small preserved whole figs (roughly chopped), or about 1/2 cup fig preserves
1 teaspoon dried thyme leaves, or 2 teaspoons fresh thyme
2 ounces fresh goat cheese
3 ounces prosciutto, torn into pieces

In a medium skillet over low heat, heat the olive oil.  Add the red onion and cook slowly, stirring frequently for 45 minutes to one hour, or until the onions are almost dry, and deep purplish/brown in color. (Regular white/yellow onions work well too).  If you don't that much time, just cook them for as long as you can.  Set aside.  

Spray a baking sheet with non-stick cooking spray.  Preheat oven to 400.  If you're using a homemade dough, spread it out and prebake it for 5 minutes.  Do the same thing if you're using a premade, refrigerated dough.  

Spread the chopped figs/fig preserves over the crust.  It may not look like it's enough, but you don't want this to be overly sweet.  Sprinkle with a touch of salt and pepper, and the thyme.  Scatter the prosciutto over the spices.  Then distribute the onions over the top, and dot with pieces of goat cheese.  

Return the pizza to the oven, and back for an additional 8-10 minutes, or until the crust is deep golden brown.  The goat cheese will get very soft, but will not melt completely.  

Slice and serve immediately.  


 David, Rebecca, and I practically inhaled this.  I made another pizza (cheese and pepperoni) for the rest of the kids.  I will say one thing...this is a "dry" pizza, meaning there's no sauce at all.  You may prefer it as an appetizer instead of the main course.  Next time I make it, I'll reduce some balsamic vinegar to use as a base sauce.  (Just take 2 cups of balsamic vinegar and simmer until reduced by at least half, and is the consistency of maple syrup).  I think that, along with a touch more thyme and pepper, will be a nice compliment to the salty prosciutto and tangy goat cheese.  

This would a perfect treat to make for a cocktail party, ladies night out, or just for a quiet night in. :-).  Everyone loves pizza...and it's a nice change from your usual tomato-cheese combination. 

Hope you're enjoying your summer.  God bless your table tonight!

PS...You may have noticed I'm not posting as many pictures as I usually do.  I really love taking pictures of every step, but I just don't have the time these days.  It's tricky trying to hold the camera while a baby is tugging/fussing/crying at your knees too. So for now, less pictures, but hopefully plenty of details regarding each recipe so you won't miss a thing. ;-)

Monday, July 16, 2012

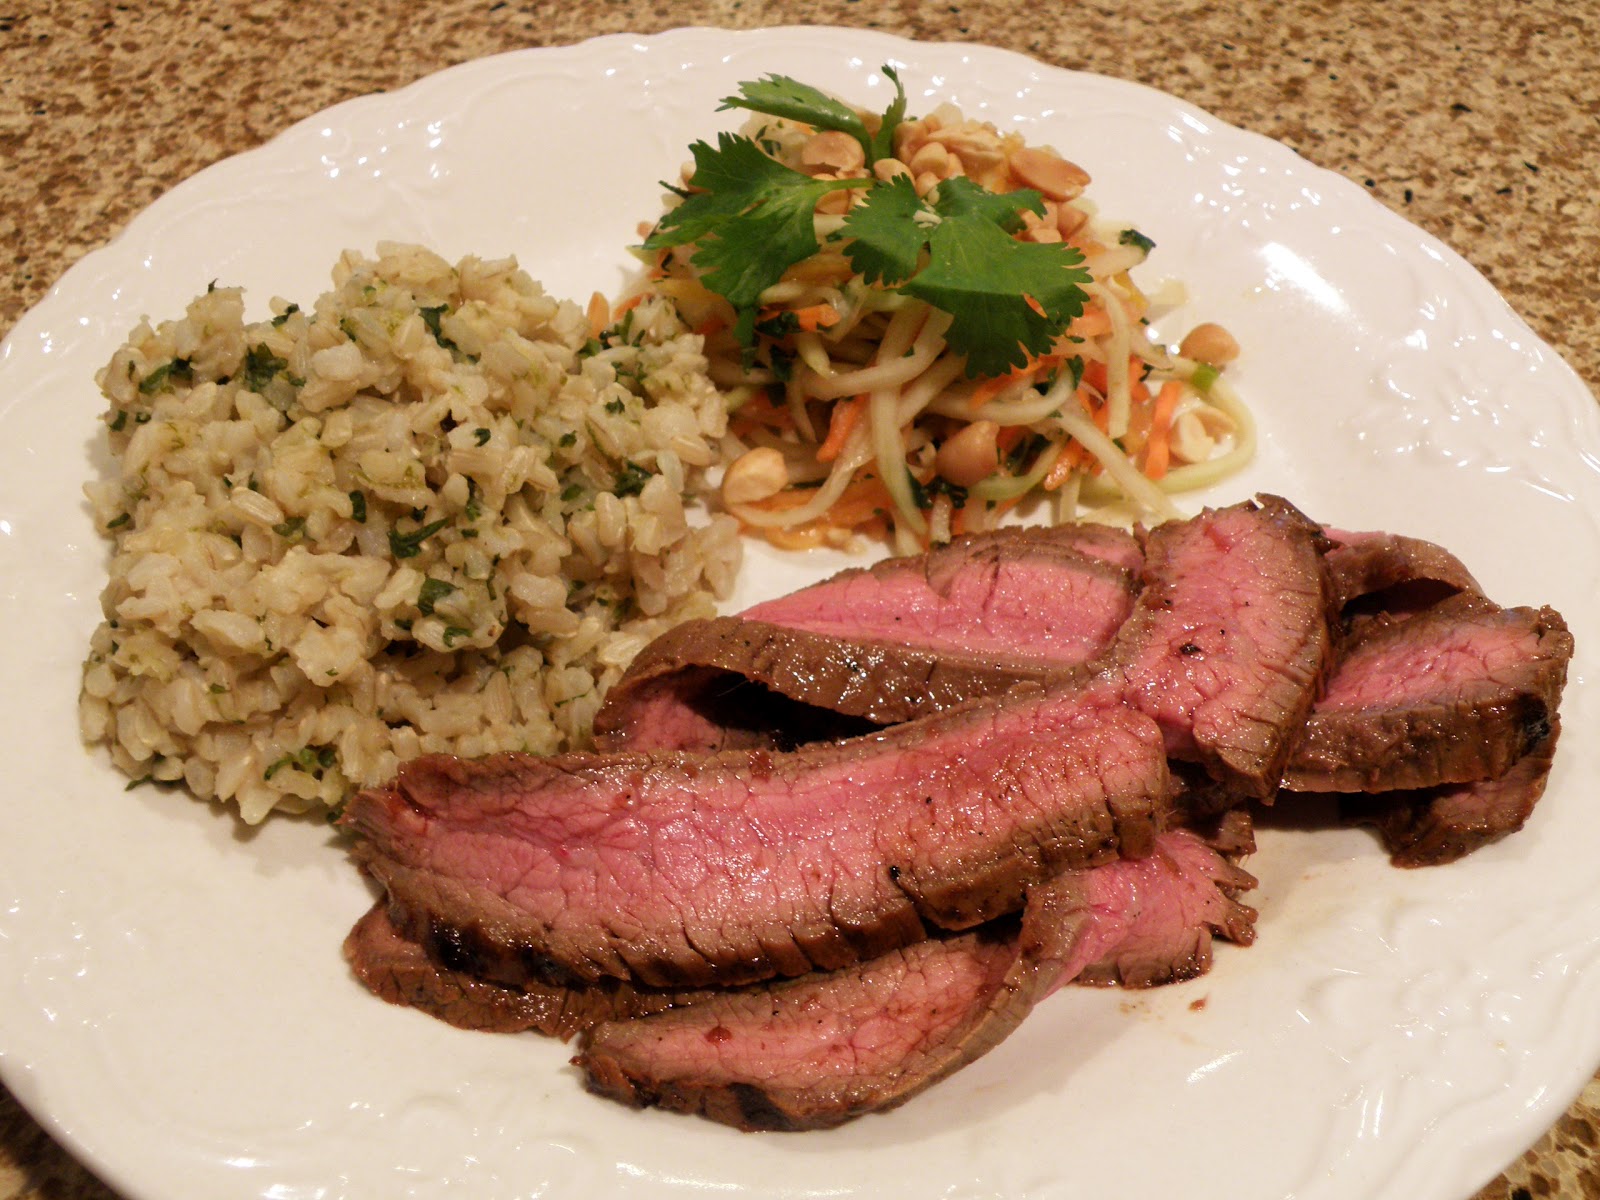
Asian Grilled Flank Steak with Cilantro-Lime Brown Rice and Green Papaya Salad

Ever since we got back from our trip to Utah, I've been somewhat obsessed with this green papaya salad I had a Takashi.  I just LOVED the combination of classic Thai flavors...sweet, sour, salty, and spicy.  Once we got back home, I was determined to try and recreate it.  I am still on my healthy eating kick, although I admit I haven't gotten back to my exercise routine yet.  It's been pouring rain for the past week!  

First, I had to find green papayas.  A query on Facebook and a friendly answer led me back to Hong Kong Market...where I found green papayas aplenty.  We hadn't had beef in a while, so I grilled up a flank steak, and made some simple brown rice with some cilantro and lime to compliment the flavors in the steak marinade.  

When I tried my homemade papaya salad, I was not disappointed.  The only difference was the spice factor...it was a tad spicy...not overwhelmingly so, but it was "there." ;-)  Next time, I'll only use one squirt of siracha. Feel free to modify the dressing ingredients to your taste.  

Asian Grilled Flank Steak with Cilantro-Lime Brown Rice and Green Papaya Salad 
(Steak recipe courtesy of Skinnytaste.com)

For the Asian Grilled Flank Steak recipe, click here.  I used Gina's recipe from skinnytaste.com...but to save time, I didn't skewer the meat, just grilled the whole steak and thinly sliced it.  

FOR THE RICE:
2 cups low-sodium chicken broth
1 cup brown rice
Juice and zest of 2 limes
1/4 cup freshly chopped cilantro
Salt 

Bring the chicken broth to a boil along with 1 tablespoons of salt.  Add the rice and reduce the heat to a simmer.  Cook for 45-50 minutes until all the broth is absorbed and the rice is tender.  Fold in the lime juice, zest, and cilantro.  Set aside.  


FOR THE GREEN PAPAYA SALAD:
1-2 firm, green papayas (they really need to be VERY under ripe)
1/2 cup shredded carrot (buying the preshredded carrots in the produce section saves time!)
3 green onions, minced
1/4 cup freshly chopped cilantro, plus more for garnish
1/4 freshly chopped mint
1/4 cup unsalted peanuts, dry-roasted and chopped fine

DRESSING:
1/4 fresh lime juice
3 tablespoons fish sauce
2-3 teaspoons packed brown sugar
1 tablespoon garlic, minced
1-2 squirts of siracha (found in the Asian aisle of your grocery store)

In a large bowl, combine all the salad ingredients except the peanuts.   I found that 2 medium-sized papayas was a good amount to use with the dressing.  Mix all the dressing ingredients together and pour over the salad.  Toss well, and serve immediately, garnished with the chopped peanuts and cilantro if desired.  You can also hold the salad in the fridge for 6-8 hours...it'll be fine. :-)

Would you believe that 2 of my kids actually ate the salad?  Rebecca said, "It tastes like everything...sweet, and spicy!"  David said it was great...and even Theresa noshed on a few shreds of papaya and carrot. :-)

Although it was a big more work than I anticipated, and my kitchen was a MESS afterwards, I really want to keep this papaya salad in my repertoire.  It's super healthy, delicious, and refreshing during the hot summer months.  Go to your nearest Asian grocery store...all the ingredients should be there...and it'll be a fun field trip for the kids.  Now...if only I had some sushi to eat with the salad!

Enjoy, and God bless your table tonight! 

Saturday, July 14, 2012

BBQ Pork Chops with Mango Salad

David is pretty good about getting meat at the grocery store when it's been marked down.  Some people turn up their noses at protein that's about to expire.  But as long as you cook it right away, or freeze it immediately, it shouldn't be an issue.  We've gotten everything from brisket, to ground beef, to chicken quarters this way.  

Last night, my hubby came home with 2 big packages of chicken leg quarters.  There were 4 to a package...one was $3.30, and the other one was $2.40.  And, they were preseasoned with lemon-pepper to boot.  Good job honey! :-)

So...I will grill off that chicken sometime within the next day or two.  For today's post, I made some simple BBQ pork chops, and paired it with a cool mango salad...perfect to serve on a hot summer day.  It would be equally tasty with steak or chicken too!  I 

BBQ Pork Chops with Mango Salad

6 bone-in or boneless pork chops (more if you're feeding a family of our size ;-)
BBQ spice rub of choice
BBQ sauce of choice

2 ripe, but firm mangoes, cubed
1/4 cup thinly sliced red onion
1 tablespoon freshly chopped mint or basil 
1/4 crumbled feta cheese
Juice of 1-2 small limes
Black pepper to taste 

Preheat your outdoor/indoor grill pan to medium high heat, and lightly oil the grates/pan.  Sprinkle both sides of the pork chops with the BBQ spice blend.  Rub it in to make sure it sticks (this can be done earlier in the day to give the meat a chance to marinate the seasonings).  Grill the chops for 3-4 minutes per side or until a meat thermometer reads 135-140 (keep in mind it will rise a few more degrees once you remove it from the grill).  I honestly don't bother with a thermometer...I just poke  the meat with my finger...if it gives just a tad, it's done.  Just watch 'em...and don't make pork bricks!
For the salad...combine the mango, red onion, mint or basil (use the mint for a "fresher" taste or the basil for a "peppery" taste), feta cheese, lime juice, and black pepper.  This can sit out for one hour before serving if you'd like to meld the flavors.  I personally like mint...but it's totally up to you.  

Serve the pork chops with the mango salad.  You can also put out some baked beans if you have picky tongues at the table like I do.  


Well...I was pleasantly surprised to hear no complaints over this meal.  David, Rebecca, Theresa and myself all loved the salad...the other kids had baked beans and baby carrots.  So everyone got their veggies...score one for Mom!  I personally loved the salty, earthy feta with the sweet, cool mango...it was refreshing on a damp, rainy day.  

Enjoy, and God Bless your table tonight!  

Wednesday, July 11, 2012

Salt Lake City Eats

David and I went to Utah over the 4th of July week.  We stayed at Snowbird Ski and Summer Resort, and had an awesome time.  We had a condo with a full kitchen, queen-sized bed, and a 2-person hot tub on the balcony...perfect after a long day of alpine activities and walking around Salt Lake City. 


But what I really wanted to share with you in this post is all the tasty food we ate.  I mean...that's the most important thing when you go on vacation, right? ;-)


First stop...Blue Plate Diner.  David just googled for places on Yelp, and this where we ended up. 
I had the Eggs Benedict with Salmon (he had a burrito with a green pork chili sauce).  


I thought it was pretty good...the salmon was fresh, and the hollandaise sauce was light and lemony...not heavy at all.  I did think the onions could have cooked longer...they were practically raw. 


A day later, we had dinner at Red Rock Brewing Company.  David had the BBQ Chicken Pizza (which he said was good, but the chicken could have had more flavor), and I had the Sweet Potato Cannelloni.  It was amazing...and very rich.  Good thing I behaved myself and had a big salad first (and only ate 2/3rd of my entree).  I honestly don't think I could have had more).  


Thursday night found ourselves at a popular Mexican joint...The Red Iguana.  They're famous for their moles...I think 8 different kinds?  I had the Mole Negro with Chicken, and David ordered the Seafood Fajitas.  Both plates were SO GOOD.  Trust me...we're from Texas..  We know good Mexican food.  


The only thing amiss at this place was David's margarita.  I had a mango margarita...and it was just fine.  But David's first one tasted like water, and the second one, although better, was sour and limey...not bright and sweet, with an aftertaste of tequila.  Maybe it's hard to get good liquor in Mormon town?  Oh well.  


Our last night on vacation, we decided to splurge a little, and I was craving sushi.  I needed some healthy fresh food!  So David consulted Yelp again (lol), and we walked into Takashi...supposedly the "best" sushi restaurant in Salt Lake City. 


Well...some may have a difference of option, but the food at Takashi was superb.   This was definitely my favorite meal from the whole week.  They fly in fresh fish nearly every day...and it shows.  My sashimi plate was stellar...the fish tasted firm and sweet, the miso soup was hot and savory...and I devoured the green papaya salad so fast...David only got 2 bites.  I guess I was hungrier than I thought (sorry my love!).  ;-)


Here's the sushi we had...yellowfin tuna with scallions.  YUM.  

I didn't get a pic of the sashimi plate...here's one I'm borrowing from Yelp.  I know...some people aren't sure about raw fish.  But you have to believe me...if it's quality fish, and really fresh...you might change your mind.  I had tuna, salmon, octopus, and 2 others I can't recall at the moment.  I loved it all!


I didn't get a picture of my green papaya salad...but I made it once we got back home!  I had to go to the Hong Kong Market to buy the fruit, but it was worth the trip.  Bright, fresh, and healthy...perfect for noshing on during the hot summer days. 


Here's a pic (courtesy of Yelp again) for now...
We did a lot more than just eating around town...which you can read about here.  But I would love to go back some day.  The kids would have a blast at the ski resort...summer or winter time.  While they might not appreciate all the food we had, I'm sure we could make some modifications for eateries, lol.  


Anyways...that's my food tour of Salt Lake City for ya! 


God bless your table tonight!

Friday, June 1, 2012

Dump Cake--Three Ways! (minus a few pics)


Yikes.  I looked at the date of my last post.  Time flies when you're busy!  Ah well.  Today is the last day of school for my kiddos. I'm making brownies tonight as a special surprise, and I have not one, but THREE recipes for you today.  

I can't believe I haven't posted about this cake yet.  I first tasted this at a CCL potluck dinner years ago.  It was easy and a cinch to make.  I realized you could change up the ingredients and make it according to your tastes, or the season.  

I want to go ahead and say I don't have pictures of the apple dump cake.  I though if I showed ya'll  how to make the other two, you would figure it out. ;-)  And...I didn't have the ingredients on had either.  That's my confession for the day!

I think the Cherry Chocolate Dump Cake is great for the winter.  The Caramel Apple Dump Cake just says, "fall!"  And the Lemon Blueberry Dump Cake is perfect for a spring/summer picnic or barbeque.  Any one of these cakes can be made at the last minute, and is ready to serve in 45 minutes.  Can't beat that when you're a crazy, busy mom, right? 

Cherry Chocolate Dump Cake

2 cans cherry pie filling (and don't use the "reduced sugar" or "light" stuff, bleh!)
1 box chocolate or devil's food cake mix
Chocolate syrup, about 1/3 cup
1 stick of butter, melted (none of that margarine stuff either!)
1 package (2 ounces) sliced pecans/almonds

Preheat the oven to 350 degrees.  

Lightly grease a 9x13 baking dish.  Pour in the cherry pie filling, and spread it evenly.  Drizzle over the chocolate syrup.  Not too much, you want to see the cherries.  Next, sprinkle over the cake mix...it will be a thick layer.  Spread it out evenly.  Now pour the butter over the cake mix...and don't skimp.  Paula Deen would probably use 2 sticks of butter!

Sprinkle the pecans/almonds over the top (I was out of pecans, so I used almonds).  Bake at 350 degrees for 25-30 minutes or until you see the cake bubbling just a little around the edges.  Let sit for 10 minutes before serving. 


Lemon Blueberry Dump Cake

2 cans blueberry pie filling, or 4 cups fresh blueberries, washed and patted dry
1/4 cup sweetened condensed milk
1 box lemon cake mix
1 stick of butter, melted
1 package (2 ounces) sliced almonds (or nuts of your choice)

Lightly grease a 9x13 pan baking dish.  Pour in the blueberry pie filling or fresh blueberries (fresh berries are in season right now, the pie filling is great for winter time).  Drizzle over the sweetened condensed milk (some recipes I've seen call for a can of crushed pineapple).  Spread over the lemon cake mix, and pour the butter evenly over the top.  Finish with the sliced almonds.  Bake at 350 degrees for 25-30 minutes or until you see the cake bubbling gently around the edges.  Let cool for 10 minutes before serving.  

Caramel Apple Dump Cake

2 cans apple pie filling
1/4 cup caramel syrup/sauce
1 box spice cake mix (yellow or white cake mix is fine too!)
1 stick of butter, melted
1 package (2 ounces) chopped pecans  

Lightly grease a 9x13 baking dish.  Dump in the apple pie filling and spread evenly.  Pour on the caramel syrup/sauce.  It's really sweet, so go very sparingly with this one.  Spread the cake mix evenly over the top.  Drizzle with the melted butter, and finish with the pecans.  See why this is called a dump cake?  You literally dump everything into the pan, and the oven does the rest. :-)

Bake at 350 degrees for 25-30 minutes or until you see little bubbles around the edges of the cake.  Let it sit for 10 minutes before serving.  

And now of course...pictures to prove how simple this is!


And of course, silly me forgot to take a picture of them once they came out of the oven.  Sorry!

I gave both cakes to David to take to work, with strict orders not to bring them home, since I was already making brownies that night for the kids.  He said the desserts went over very well with the office staff, especially the Lemon Blueberry Dump Cake.  Score!

My kids are out of school now, and are happily tearing the house apart.  Okay...not really, but it sure looks like it!  Happy summer y'all!

God bless your table tonight!

Thursday, April 12, 2012

Versatile Blogger Award

Thanks to Amy from The Savvy Kitchen, I have received my very FIRST blogger award!


How cool is that? Seriously...I'm very honored...and humbled. :-)

The award works like this:
  • Thank the person who awarded you by linking back to their post
  • Pass the award along to 15 other new or newly discovered blogs
  • List 7 interesting things about yourself

So here are 7 things about myself I hope you find interesting

1.  I drive a minivan, but I really want a car with a clutch.  My first car had a stick-shift, and I LOVED it. 
2.  I have an identical twin sister.  Yes, identical.  But we're pretty different in terms of personality, decorating tastes, and style of clothes. 
3.  I hate painting my toenails, but can't really stand anyone else touching my feet.  I guess it's just a thing with me. So no professional pedicures for me either. 
4.  I'm half Asian, but my maiden name was "Cordero" which means lamb in Spanish.  That's because my grandpa is from Puerto Rico.  I know... :-) Ask me later!
5.  In June, we will celebrate our 14 wedding anniversary.  Wow. 
6.  I love those huge, crazy hair bows, and want to put them on my baby girl.  But every time I pick one up, I put it back.  It just looks too big on her little bitty self!
7.  I still have 10 pounds I really want to lose from my last pregnancy.  Yes...it's a confession!

Here are the 10 blogs I am passing this award on to (I was supposed to do 15, but I honestly started to get a headache, and didn't want to risk getting a full-blown migraine).  

3.  Newlyweds

Enjoy checking out these other yummy blogs...I sure have!  

Basil Pesto Roasted Chicken

Now that Easter is over, and you've had all the ham you ever wanted (at least until next Easter), I wanted to show you a quick, delicious chicken recipe that's as simple as they get.  

I still have plenty of basil pesto in the freezer, which I put up nearly every fall, and I use it in pasta, sandwich spreads, bruschetta, soups...just about anything I want!  It's perfect for seasoning a whole, butterflied chicken, roasted in the oven and there's seriously very little effort involved. 

If you don't have homemade pesto, rest assured, store-bought pesto is just fine.  Once you try this, you will kick yourself for not having done it sooner.  And when you do...not try using my cilantro pesto recipe to roast a chicken...it's really good too! :-)

Basil Pesto Roasted Chicken

One recipe basil pesto, homemade or store-bought
One whole chicken, 3-4 pounds, butterflied and patted dry
Nonstick cooking spray
Salt and black pepper to taste

To butterfly the chicken, lay it on a large cutting board backside up.  Use a sharp knife or kitchen shears to cut out the backbone.  Never done this before?  It's a piece of cake.  Here's a tutorial if you're nervous:


Once you've cut out the backbone, flip the chicken back over and press down on the breastbone until you hear it crack.  See, nothin' to it!  Show that chicken who's boss! Prepping the bird this way helps it cook more evenly that if you left it alone.  Of course, you don't have to butterfly the chicken, but I like to do this when I'm seasoning it...it helps me ensure the pesto gets into every nook and cranny. 


Now spread some basil pesto all over the chicken.  Make sure to gently work some in under the skin too!  I probably used about 1/3--1/2 cup total.  I honestly didn't measure. ;-)


If you can, do this ahead of time and let the chicken chill out in the fridge for a few hours before roasting.  This gives time for the meat to marinate and soak up some of that delicious flavor. 


Before you're ready to cook it, season the exposed skin of the chicken with salt and pepper.  You don't want to go overboard. The cheese and basil in the pesto are often enough for flavor, so you can skip this step altogether if you'd like.  


Now, remember that weird looking broiler pan your oven came with when you moved into your house?  You know...this funny lookin' thing?  


You can use the broiler rack and tray, or a rack like mine. I like to line the bottom tray with foil for easier cleanup later. Spray the top tray/rack generously with nonstick cooking spray.  Don't have a broiler pan?  No problem.  Just use a rimmed baking sheet and a cooling rack or a 9x13 baking pan with a rack inside.  The point is to use something that will allow heat and air to circulate all around and underneath the chicken. 


Preheat the oven to 375 degrees.  


Lay the chicken breast side up on your prepared rack. Place the legs out with the ends close together, and tuck the tips of the wings underneath the breasts, like this:


This will help the whole bird cook evenly. 


Roast at 375 degrees until a meat thermometer registers 165 in the thigh.  Just remember the temperature will rise 5-10 degrees as it rests.  I usually go to 160, take it out, and let it rest for 10 minutes before carving it.  I also leave the meat thermometer in to ensure the temp gets to 165.  


Look at that..."winner winner, chicken dinner, right? :-)


Once the bird is cool enough to handle, carve it up and serve immediately.  I made roasted green beans and pan-fried polenta on the side.  


I'm nearly at the point where one chicken isn't enough for us anymore.  There's just enough for 2 meals for our family of 7.  Pretty soon, I'll have to roast 2 birds instead of one.  What can I say...my kids love roast chicken.  I mean seriously, who doesn't?  And BTW, leftovers make amazing sandwiches, with some basil pesto mayo (just mix a bit of pesto into some mayonnaise!).  Rebecca always makes herself a sandwich like that the next day.  Smart girl. ;-)


So that's another tried a true chicken recipe for ya.  If you're like me, you can never have enough good chicken recipes in your arsenal. 


God bless your table tonight!